Eos Apex 5

The Eos Apex 5 console is the compact powerhouse of ETC’s flagship lighting controllers, and is engineered for comfort and customization on the go. The condensed programming surface provides access to all of the same tools as the larger Apex desks, in a portable form factor.
Setup Guide
Prepare your Eos Family device for use by following these setup steps:
- Insert the included power cord, locking it into the IEC socket under the hard power switch on the back of the device. Connect the other end of the cord to wall power.
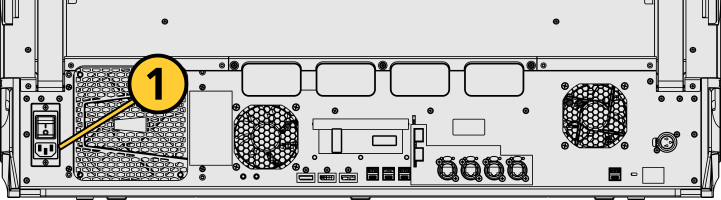
CAUTION: Power cord must be connected using an earth ground connection.
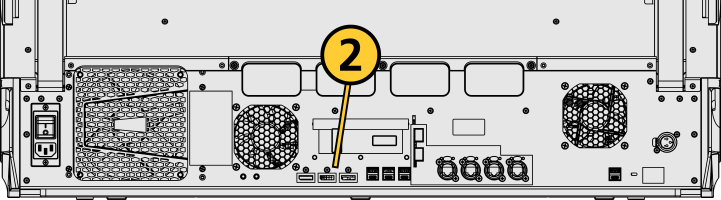
- Connect any external monitors to the appropriate device ports, as well as their own power sources.
- Connect any USB devices, such as an external mouse or the included keyboard.
- Connect any network cabling to the appropriate Ethernet port.
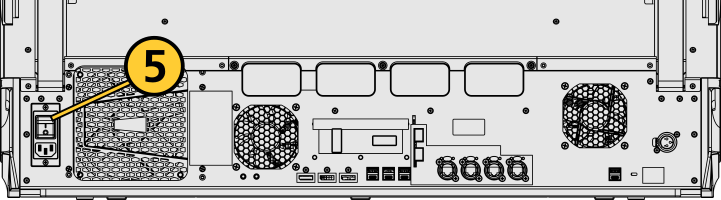
- Activate the hard power switch above the IEC socket.
- Activate the soft power button on the front of the device.
- Choose one of the Supported Eos Device Roles to log into the Eos application.

Once your Eos Family device is up and running, Get Started with information about Eos System Requirements and Setup, Eos Family Resources, and Using This Manual.
Physical Overview

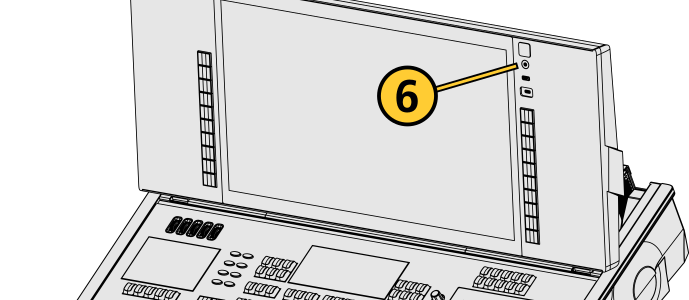
| 1 | Power Button | 9 | Fader Touchscreen | 17 | Book Lights |
| 2 | USB-A and USB-C (Data) | 10 | Fader Buttons | 18 | Littlites |
| 3 |
|
11 | Endless Fader Wheels | 19 | IO Garage |
| 4 | Hardkeys | 12 | Encoders | 20 | Display Port |
| 5 | Keypad Touchscreen | 13 | Mini Encoders | 21 | SFP+ |
| 6 | Target Keys | 14 | Level Wheel | 22 | Ethernet |
| 7 | Main Playbacks | 15 | Keyboard and Accessory Tray | 23 | Hard Power Switch |
| 8 | Motorized Faders | 16 | USB-A (Power) | IEC Socket |
Power
Power Button
The soft power button on the front of your device is used to power it up or down. You can also power down your device via {Power Off Device} in the Browser.
Hard Power Switch
A separate hard power switch, located on the rear panel above or below the power cord socket, supplies or disconnects power from the console’s internal components.
CAUTION: It is recommended that you safely power down before disconnecting power from the console.
WARNING: Before servicing your console, you must switch off the power on the rear panel and disconnect the power cord completely.
Battery
WARNING: This device contains a lithium battery. Battery may explode if mistreated. Do not recharge, disassemble or dispose of in fire.
Internal Touchscreens
Apex consoles are designed with one (Apex 5) or two (Apex 10 and 20) internal touchscreen displays, supporting haptic feedback or pressure-sensitive touch. The main touchscreens may be used to display and control show data. They may also be used as a variety of other virtual controls and displays.
Touchscreen position can be changed by freely adjusting the screen panel's height and angle.
Touchscreen brightness can be controlled via Setup > Device > Brightness Settings and Presets.
External Monitors
Apex consoles support up to three external Display Port monitors compatible with Windows 7 or later.
Monitor Specifications for Display Port Devices
- Display resolutions from 1920x1080 to 3480x2160 (4K) are supported.
- DisplayPort v1.2. maximum resolution 3480x2160 (60Hz refresh rate). Video adapters may have their own ratings and limits.
- Each display may be utilized in landscape or portrait mode.
- Multi-touch display support requires:
- Data connection via USB-A or USB-C cable per multi-touch monitor.
- Windows Human Interface Device (HID) compliant touch displays, utilizing Windows standard driver.
- Displays must process five or more points of simultaneous touch.
- Display Data Channel / Control Interface (DDC/CI) is supported for control of external monitor brightness.
External monitors that support Display Data Channel / Command Interface (DDC/CI) via Display Port can be dimmed from Eos via to Setup > Device > Brightness Settings and Presets.
For monitor configuration, see {Monitor Arrangement...}.
Hardkeys
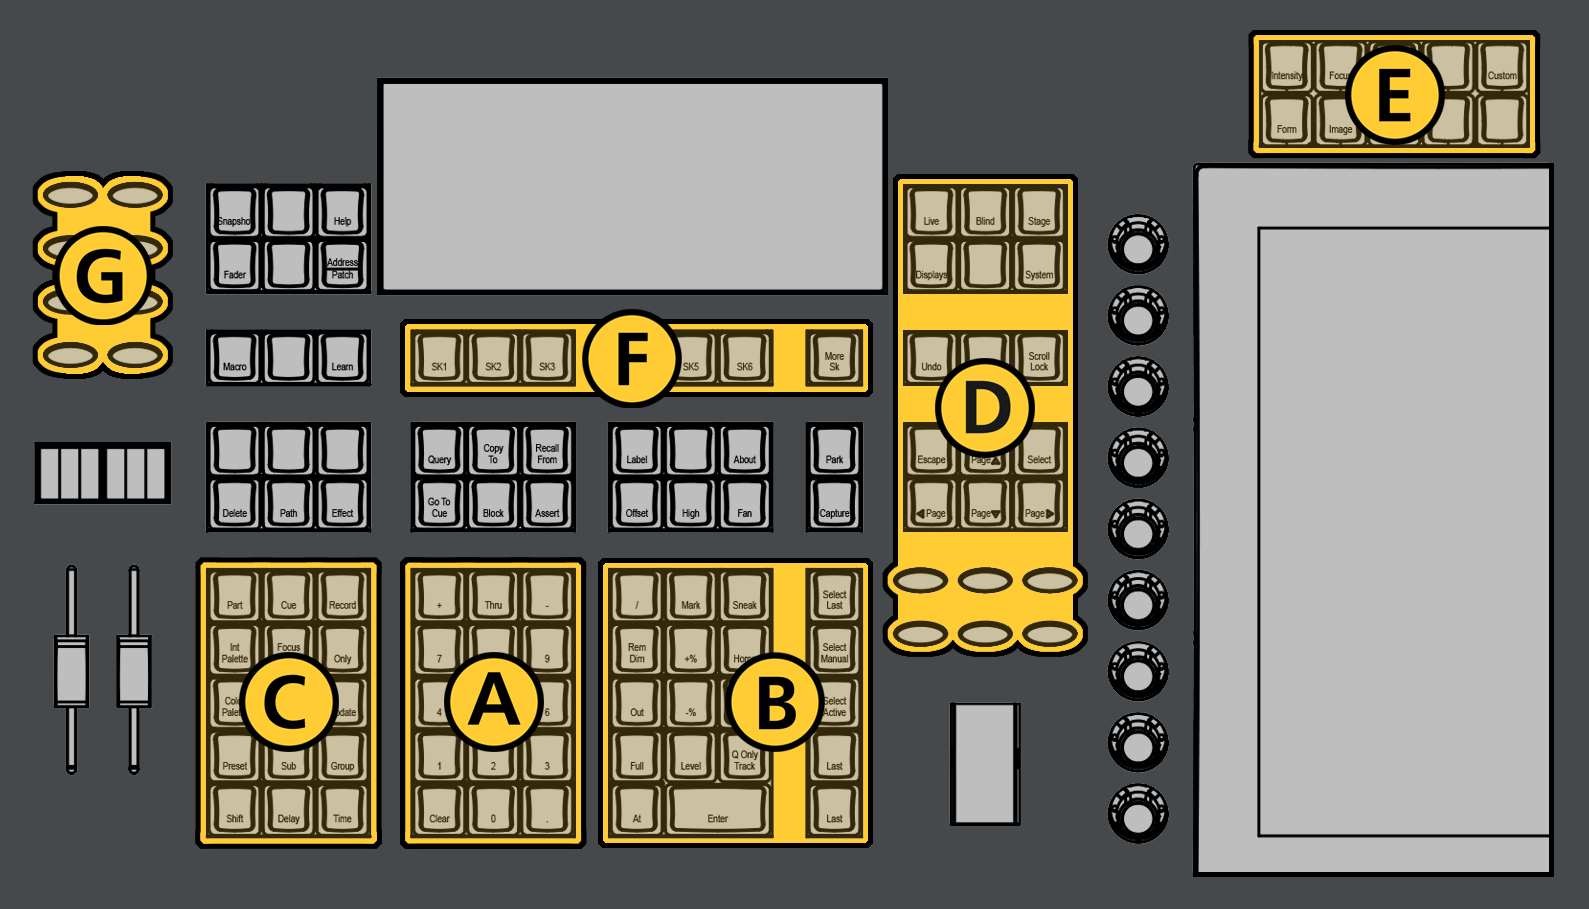
The backlit hardkeys provided on the face panel are divided into several sections based on their functionality.
| A | Keypad | The numeric keypad allows you to type numbers for channel or target selection via the command line, along with modifier keys to alter your selection. |
| B | Level Controls | The level controls provide options for altering the intensity levels of channels, along with a number of other non-intensity parameters / targets. |
| C | Targets | The target controls provide options for altering a variety of record targets, as well as shortcuts to various Blind displays. |
| D | Display and Navigation | The display and navigation keys provide quick access to common displays, formatting, paging, and navigation within displays. |
| E | Encoder Categories | The encoder category buttons allow expanded control of a variety of fixture parameters, along with additional softkey options where applicable. |
| F | Softkeys | Softkeys allow physical control of context-based software options that change in response to the active display or command line syntax, including the onscreen softkey options, offering additional commands not available on hardkeys. |
| G | Fader Controls | The fader control buttons provide additional options for easy local control of fader behavior. |
Additional Targets & Functions
Other hardkeys provide options for a variety of common console functions and shortcuts to various Blind displays.
Backlight
The hardkey backlight brightness level can be adjusted via Setup > Device > Brightness Settings and Presets. When your console has been idle for 10 minutes, the backlights will fade down by 10%. Any key press on the face panel keypad or an external keyboard, a move of the mouse, or an interaction with a touchscreen will return the keys to their set brightness level.
Keypad Touchscreen
Apex consoles include a haptic touch-enabled screen above the keypad that can be configured to control custom direct selects or magic sheets.
Softkeys and a gear icon to access screen settings are docked at the bottom of this display.
Additional Targets & Functions
You may lock the face panel, which prevents any actions from the command line or CIA, and locks any wings or USB connected peripherals.
Lock and unlock the face panel using [Shift] & [Escape].
Target Keys
Apex consoles offer multiple banks of Target Keys, physical buttons with built-in high-resolution displays.
- Apex 5 - 30 Target Keys (3 banks of 10).
- Apex 10 - 40 Target Keys (4 banks of 10).
- Apex 20 - 50 Target Keys (5 banks of 10).
All Apex consoles also offer two target keys over the main playback faders for dedicated load functionality, as well as local status of playback content.
Main Playbacks
The main playback fader pair, located to the left of the control keypad, is a split cross-fader pair.
The button or buttons located directly above the playbacks load content to the playbacks. The two buttons below control the [Go] and [Stop/Back] functions.
Motorized Faders
In addition to the main playbacks, five, ten, or twenty slots of configurable motorized faders are provided. The faders may be configured as playbacks, submasters, grandmasters, timing masters, effects masters, targets, or target lists. One hundred virtual pages of 10 faders each are provided.
Fader Touchscreens
Each bank of five faders has a dedicated multi-touch display for local status of playback content.
Fader Buttons
Load buttons, located directly above each fader, are used when Assigning Faders to load a specified target to the associated fader, or to place special conditions on that fader.
Endless Fader Wheels
Apex consoles offer five, ten, or twenty detented, color-changing fader wheels, adding an endless fader and additional button to each overall fader slot. When Changing Fader Pages, each fader wheel and button is paged independently of the faders below them, effectively doubling the control capabilities of each fader slot.
Encoders
Haptic-feedback encoders and an associated touchscreen for control of non-intensity parameters are provided on the lower right of the console. The two larger encoders at the bottom are dedicated pan and tilt controls. The remaining four encoders on the right side of the console are pageable controls. By default, these encoders are populated on the touchscreen with the parameters used in your show. They can also be custom mapped.
Mini Encoders
Apex consoles also offer nine RGB-backlit mini encoders to the left of the encoder touchscreen. Eight of the mini encoders can be fully configured for expanded control of the large encoder parameters, or can have custom mapping. The bottom encoder is dedicated to mini encoder paging and configuration.
Level Wheel
The level wheel adjusts intensity up or down for any selected channels. With channels selected, roll the wheel up to increase intensity, or down to decrease it.
The level wheel can provide additional functions via Eos Console Hardkey Shortcuts when combined with various other console keys.
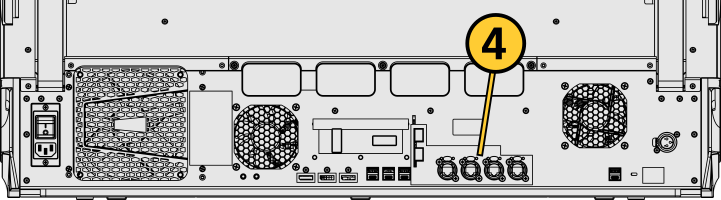
IO Garage
Apex consoles come equipped with four input / output bays for custom configuration of the available data ports on the back of the console, collectively known as the IO garage.
Any ETC Gadget II or Response Show Control Gateway can be added to the garage and connected internally via USB for local input / output of DMX, MIDI, SMPTE, and other protocols.
Network Ports
Ethernet
Ethernet ports are for connecting to a network switch, network gateways, and accessory devices. Each port can be run as a separate NIC, and can be configured to directly output network-based lighting control protocols such as sACN or Art-Net.
See Patch > Protocols and Setup > Device > Network.
All ports provide PoE++, with up to 100W per port, and 120W total across all ports.
Enhanced Small Form Factor Pluggable (SFP+)
SFP+ ports are provided for direct-to-core connection, or high-speed links between session devices, and can take a variety of sled options. Sleds are field changeable for easy reconfiguration.
Note: Eos software v3.2.0 and later, Apex consoles, Windows 10 consoles, and ETCnomad devices do not support Net2 or AVAB UDP output protocols.
USB Ports
Data Ports
USB A and C ports are provided on the front of your device to connect any USB storage device. Additional USB A and C ports on the rear panel (and in the keyboard tray, when present) can be used to connect peripherals such as an alphanumeric keyboard, pointing device, or touchscreen control for external monitors.
USB data ports cannot be used for charging devices.
Charging Ports
Two USB A ports, capable of delivering 5A / 12.5W of power each, are available for charging devices. One is located under the encoder display on the front right of the desk. The other is located under the faders on the front left of the desk (Apex 5), or inside the accessory drawer (Apex 10 and 20).
Task Lights
Littlites®
Littlites can be connected to the back of your console.

One Littllite is included. Littlite XLR connectors use the following pinout:
| Pin | 1 | Chassis ground. Jumpered to ground lug. |
| Pin | 2 | 0 VDC. |
| Pin | 3 | +12 VDC. |
Book Lights
Two independently-controlled, warm-white work lights are available on the left and right sides of Apex consoles for illumination of nearby work surfaces.
Dimming Task Lights
Task lights can be dimmed from within Eos, under Setup > Device > Brightness Settings and Presets. The {Desk Lamp} slider has a range of 0% (dimmest) to 100% (brightest). The default setting is 0%. The console will set the desk lamp to this setting on startup of the application.
Task lights can also be controlled by holding down [Displays] and rolling the level wheel.
Dimensions and Weights
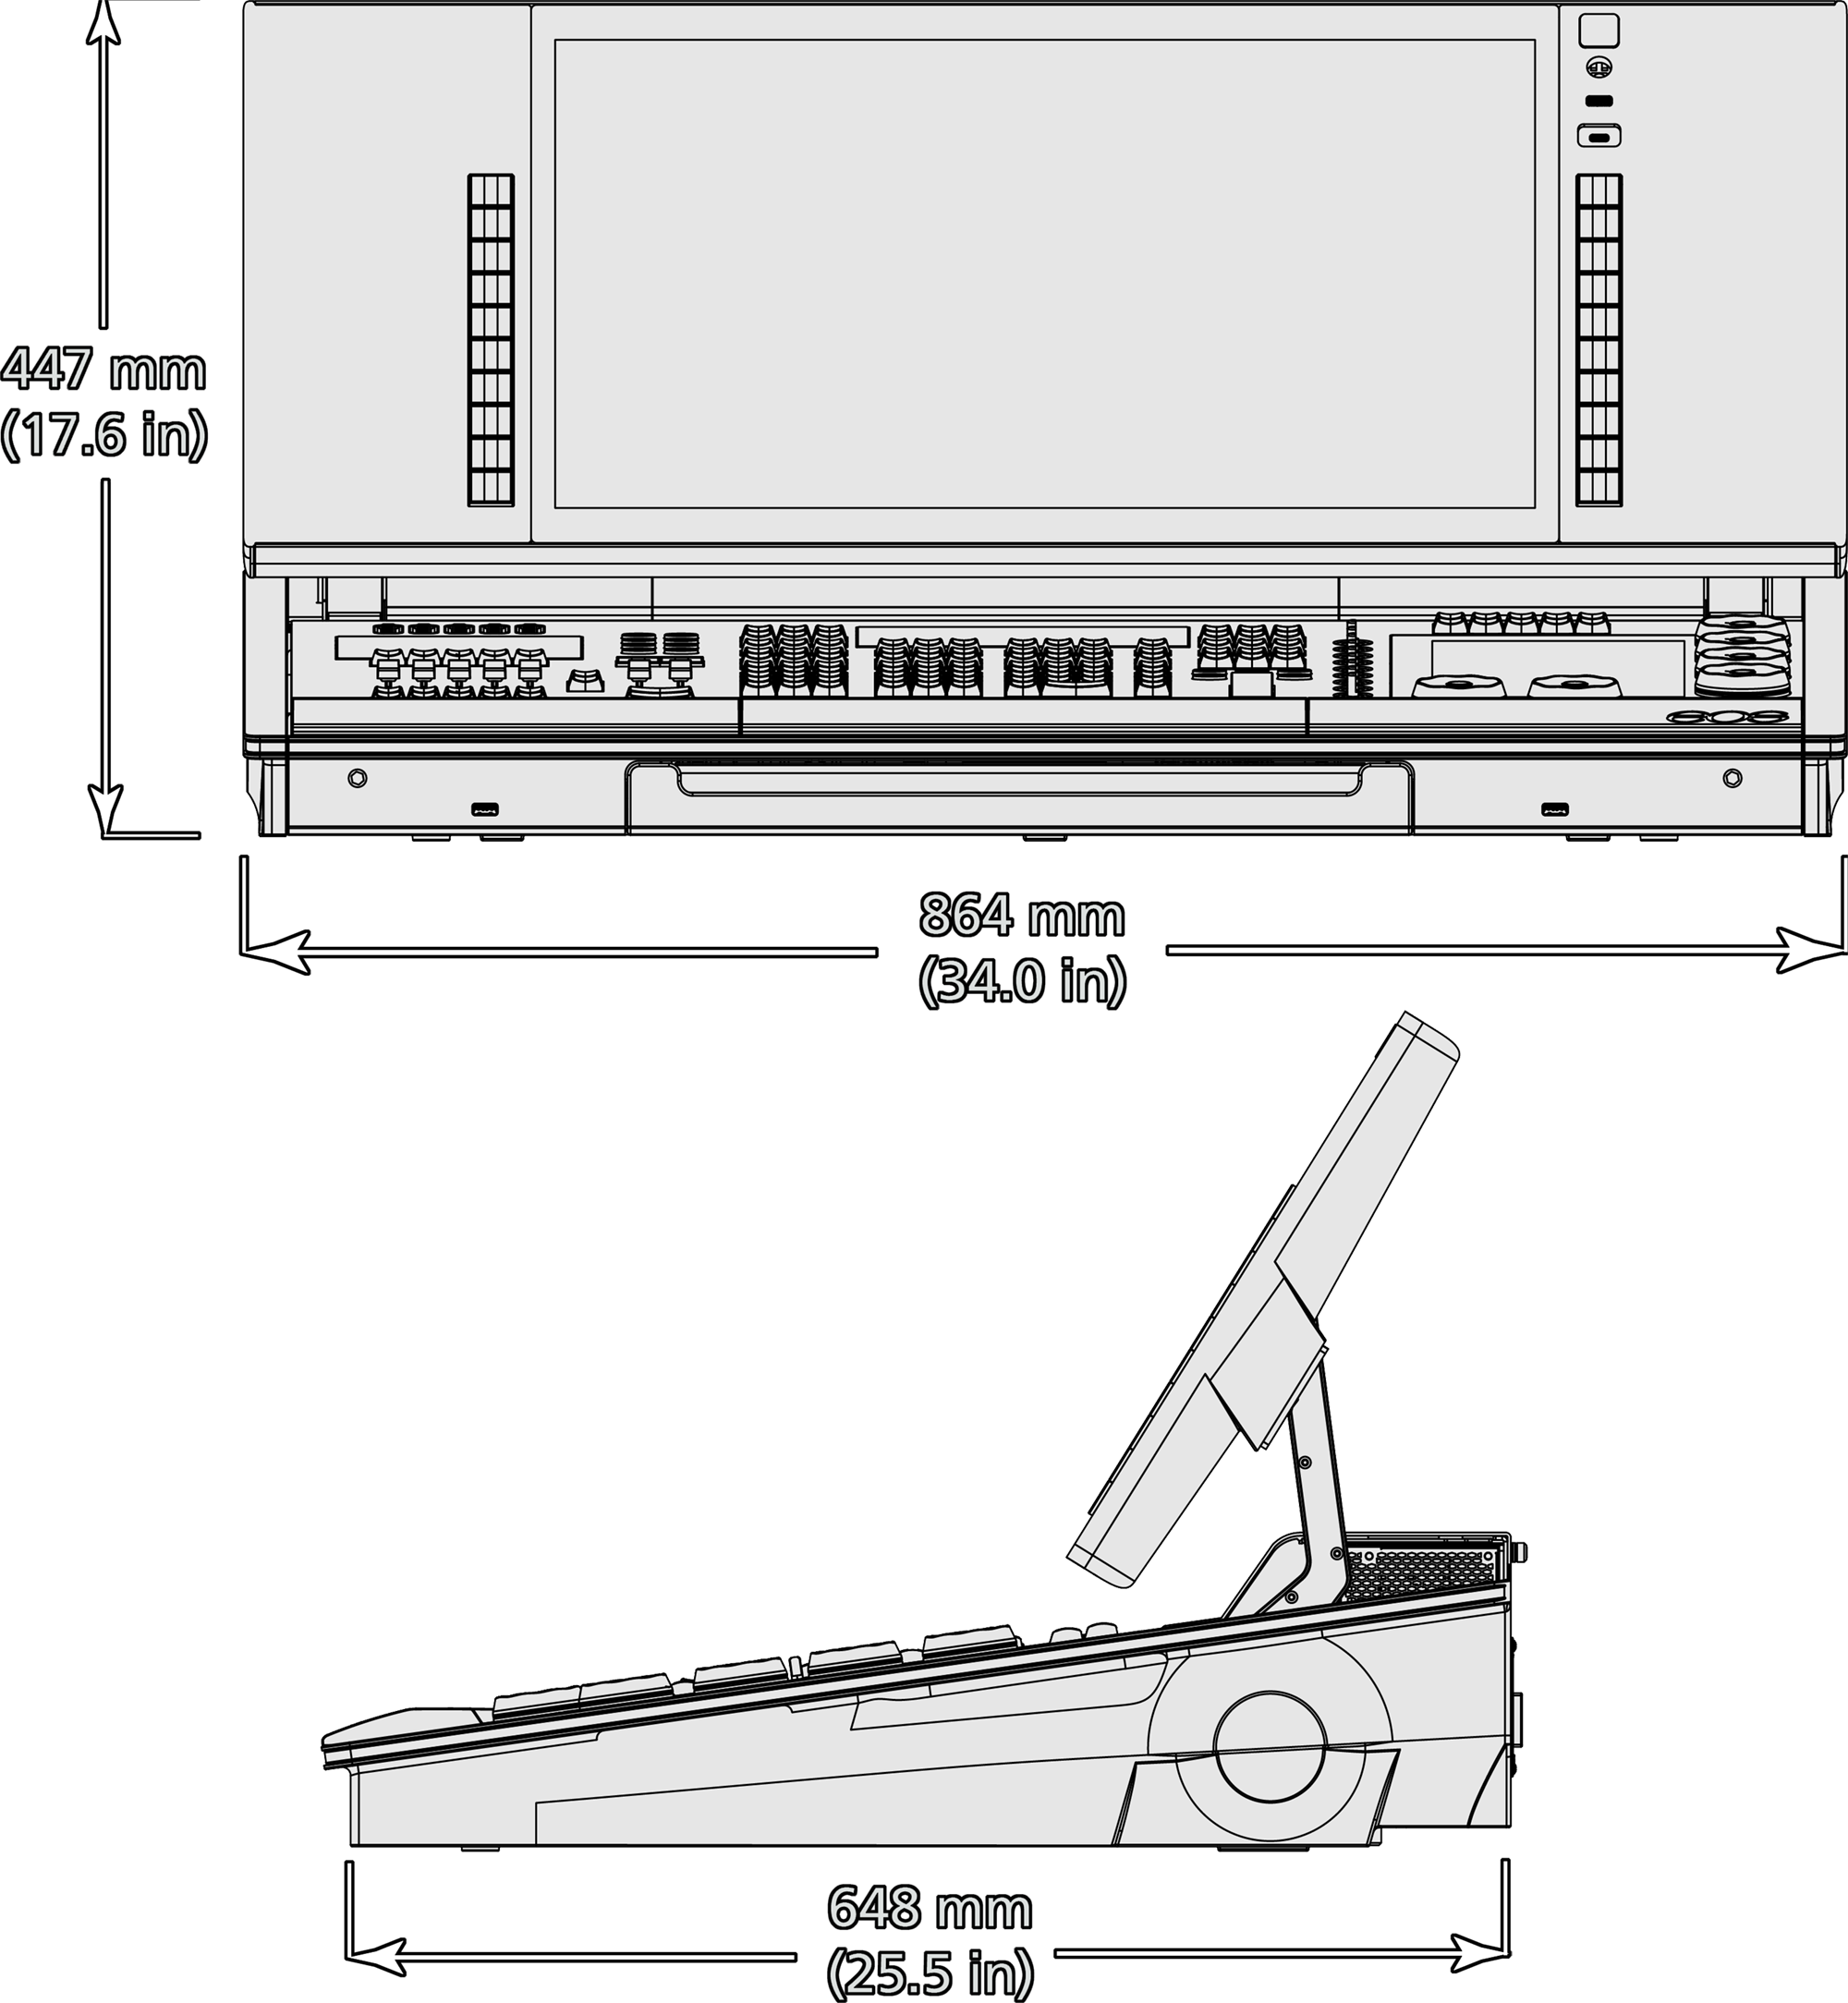
| Model | Height | Width | Depth | Weight | ||||
|---|---|---|---|---|---|---|---|---|
| mm | in | mm | in | mm | in | kg | lb | |
| Eos Apex 5 | 447 | 17.6 | 864 | 34.0 | 648 | 25.5 | 44 | 97 |
| Eos Apex 5 in shipping container | 318 | 12.5 | 966 | 48.0 | 794 | 31.3 | TBD | TBD |
| Eos Apex 5 in travel case | 926 | 36.4 | 1023 | 40.3 | 388 | 15.3 | TBD | TBD |
Ships With
- One three-button scroll mouse and mousepad.
- Cherry tenkeyless backlit alpha-numeric keyboard.
- Locking regionalized IEC power cord.
- One 24-inch LED gooseneck Littlite.
- Augment3d AR target kit.
- Dust cover.
Features, Specifications, and Requirements
Minimum Eos Software Version
The Eos Apex 5 requires Eos software v3.1.1 or later.
Supported Eos Device Roles
Eos Family device roles determine the device's behavior and abilities, primarily in Multi-Console Sessions. Roles can be chosen from the ECU Welcome Screen, which can be accessed on device startup or by exiting the Eos application to the shell via Browser > Exit.
The Eos Apex 5 can be used in the following Eos Device Roles:
- Host - previously "Master," the Host is whichever of these devices is currently leading the session:
- Client - any device logged in as a full-time participant of the session, with no ability to become a Host.
- Expansion Processor (EEP) - a device logged into Expansion Processing mode for processing and outputting additional universes of data.
- Backup Eos Expansion Processor (BEEP) - a device logged into Expansion Processing mode, assigned to track an EEP and take over in the event of failure.
- Offline - any device that has been logged into Offline mode, which may be on a network, but is not connected to a session and is not outputting.
Available Outputs
The Eos Apex 5 is available with 24,576 outputs.
Capacities
- Channels - 32,768 (any number from 1 to 99,999)
- Cues - 10,000
- Cue Lists - 999
- Record Targets
- Groups - 10,000
- Palettes - 10,000 x 4 (Intensity, Focus, Color, Beam)
- Presets - 10,000
- Effects - 10,000
- Macros - 99,999
- Snapshots - 10,000
- Curves - 10,000
- Color Paths - 10,000
- Faders
- Main Playback - 1 dedicated motorized main playback pair, with Go and Stop/Back.
- Motorized Faders - 5 motorized fader slots configurable as playbacks, submasters, grandmasters, timing masters, effects masters, targets, or target lists.
- Virtual Faders - 100 virtual pages of 10 faders each.
- Playbacks - 200 configurable cue playbacks, with Go and Stop/Back.
- Submasters - 999 configurable submasters, with Bump and Assert/ channel select.
Electrical and Thermal
- Power Consumption - approximately 5 A at 120 V or 230/240 V.
- Ambient Room Temperature - 0°–35°C (32°–95°F).
- Ambient Humidity - up to 90% non-condensing.
Regulatory and Compliance
- CE compliant
- cETLus listed
- UKCA marked
- FCC compliant
- RoHS compliant
- WEEE