Menus
Six menus are provided including the File menu, Project menu, Edit menu, View menu, Tools menu, and the Help menu.
The File menu provides the tools to create, save and restore configuration files, as well as switch to another open configuration or open a recent workspace.
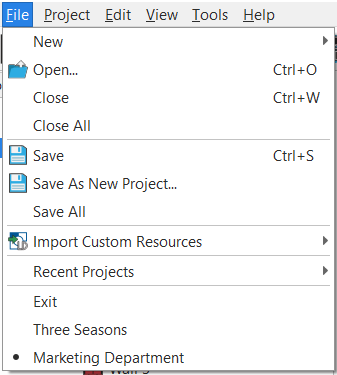
- New - opens a fly-out menu for selection of either a New Project or New Server Project
- Open - opens a system dialog box. You may also use keyboard shortcut CTRL+O
- Close - closes the active project. You may also use keyboard shortcut CTRL+W
- Close All - closes all open projects
- Save - saves the current project. You may also use keyboard shortcut CTRL+S
- Save As... - opens the Save dialog to save the current project to a new project
- Save All - saves all open projects
- Import Custom Resources (Advanced users only) - opens a fly-out menu that lists options to import custom resources (fixture, font, station, or script). See Resource Import Procedure.
- Recent Projects - opens a fly-out menu that lists the most recently opened LightDesigner configurations. Select any of the listed configurations to reopen.
- Exit - exits the LightDesigner application.
- All open LightDesigner configurations (if any) are shown. The project marked with the bullet is the currently displayed and active project.
The Project menu provides various tools that assist with creating a project, extracting LCD files, editing library data, importing and exporting data, creating reports and editing meta-data tags.
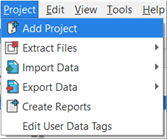
- [Add Project] - displays only when the configuration is a server project. When selected, opens the Add Project dialog.
- Extract Files - opens a fly-out menu for selection of either Portable Touchscreens or Touchscreens where you can export specified touchscreen configurations to the specified directory.
- Import Data - opens a fly-out menu for selection to import either Import Load Schedule, Import Equipment List, Import Presets, Import Timed Event, or Import Protected Days and Holidays.
- Export Data- opens a fly-out menu for selection to Export Load Schedule, Export Equipment List, Export Presets, Export Timed Events, or Export Protected Days and Holidays.
- "Create Reports" opens a "Create Reports" dialog for selection of data to include in the report which can be saved . From this dialog you may either print or save the reported data.
- "Edit User Data Tags" opens the User Data Tags Edit dialog where object metadata labels are specified.
The Edit menu provides editing tools including undo, redo, cut, copy, paste or delete.
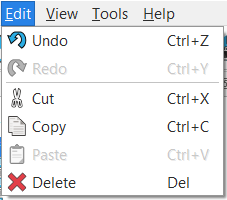
- Undo - displays when an undo action is available and displays the name of what the action will undo. Example, "Undo Reposition Channels". Alternatively, you may use keyboard shortcut CTRL+Z.
- Redo - displays when a redo action is available and displays the name of what the action will redo. Example, "Redo Reposition Channels". Alternatively, you may use keyboard shortcut CTRL+Y.
- Cut - a tool used to remove selected text or a selected object from its current location. Alternatively, you may use keyboard shortcut CTRL+X.
- Copy - a tool used to copy selected text or a selected object for later pasting in a different location. Alternatively, you may use keyboard shortcut CTRL+C.
- Paste - a tool used to paste text or an object that was previously cut or copied to the clipboard. Alternatively, you may use keyboard shortcut CTRL+V.
- Delete - a tool used to permanently delete selected text or an object. Alternatively, you may press the DELETE key on the alphanumeric keyboard.
The View menu shortcuts to each display view.
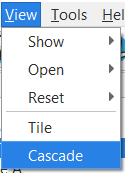
- Show > Error Browser - displays the Error Browser below the Browser. By default this is not shown.
- Show > System Time - displays the System Time in Program/Simulate, Timed Events, and Network views.
- Open > Event Log - displays the active event log in a floating window.
- Reset > Reset Views - resets the window panes for all views to their default locations.
- Reset > Reset Station Simulations - resets all simulated stations to their factory default locations. This feature is helpful when the simulated station has been moved to a different screen location or resized
- Tile - tiles all of the Plan workspaces in the project while in the Design or Program/Simulate view
- Cascade - cascades all of the Plan workspaces in the project while in the Design or Program/Simulate view
The Tools menu provides access for setting application preferences, viewing event logs, displaying of the error browser, system time, and scripts.
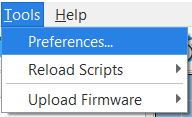
- Preferences - opens the Preferences dialog.
- Reload Scripts - opens a fly-out menu for selection of either "Reload Orphan Scripts" or "Reload Script Libraries".
- Upload Firmware - displays a fly-out menu for selection to upload firmware to connected products such as the NSPS, P‑ACP, P‑CCS, P‑TS7, and the WAS/Dock. See Upload Firmware.
The Help menu provides access to the online help system and the application software version information.

- Launch Manual - opens this online help system in your default Internet browser window.
- About - displays a dialog with the current LightDesigner application software version information.