Magic Sheet Object Inspector
Expand individual sections below to view more information, or use the Expand All button in the topic toolbar.
The object inspector is located on the right side of the Magic Sheet Editor, under the Magic Sheet Object Library, and contains all of the configuration settings for magic sheet objects. Selecting Objects allows you to modify their properties.
The sizes of the object library and object inspector can be adjusted by dragging the border between them up or down.
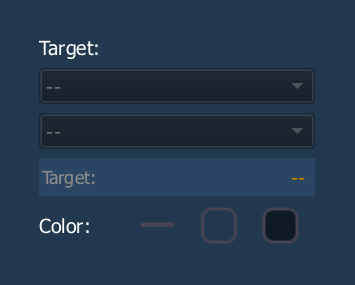
{Target}
Assigns Record Targets to the selected object. Most objects default to a target type, which can usually be changed once the object is added to a magic sheet.
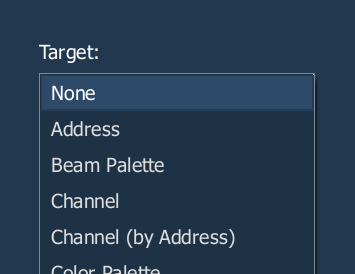
Only applicable targets for the specified object type will display in the target selection dropdown menu.
The second dropdown menu is only used with the specific targets and objects noted below.
- None - no target.
- Address - any Address. When an sACN Input object is assigned an address target, use the second dropdown menu to specify the type of sACN data to monitor. For IRGB-type addresses, assign Color to the first color address, and Intensity to the intensity control address.

- Channel - any patched Channel, specified by its channel number.
- Channel (by Address) - any patched channel, specified by its address number.
- Cue - any recorded Cues.
- Cue - Active - the current cue.
- Cue - Pending - the next cue in the current cue list.
- Effect - any default or user-created Effects.
- Fader - any assigned Faders.
- Group - any recorded Groups.
- Intensity, Focus, Color, and Beam Palettes - any recorded Palettes.
- Macro - any recorded Macros.
- Magic Sheet - any created magic sheets.
- Pixel Map - any created Virtual Media Server pixel maps.
- Preset - any recorded Presets.
- Response IO Relay - any Relay Outputs of a network-connected ETC Response Analog IO Gateway.
- Scene - any created Scenes.
- Snapshot - any recorded Snapshots.
- Submaster - any recorded Submasters.
- User - any defined User ID.
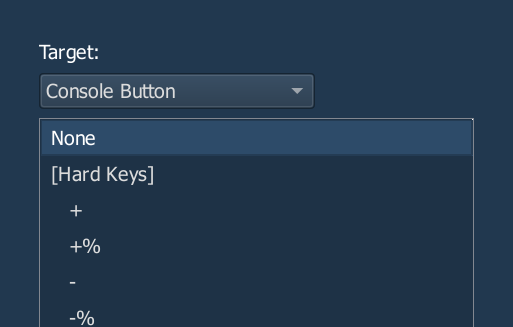
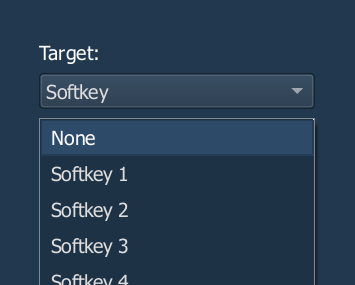
A subset of targets can be used to access console controls from a magic sheet.
- Console Button - the hardkeys on your console. Use the second dropdown to choose from a list of all hardkeys.
- Softkey - the virtual buttons in the Eos software. Use the second dropdown to choose from a list of all softkeys.
- Command - see below.
- Zoom - changes the magic sheet view to show any objects grouped with the object assigned to this target.
- Selection - selects any objects grouped with the object assigned to this target.
Color
The color section allows you to adjust object outline width, outline color, and fill color. The chosen colors will update the properties area as well as the object.
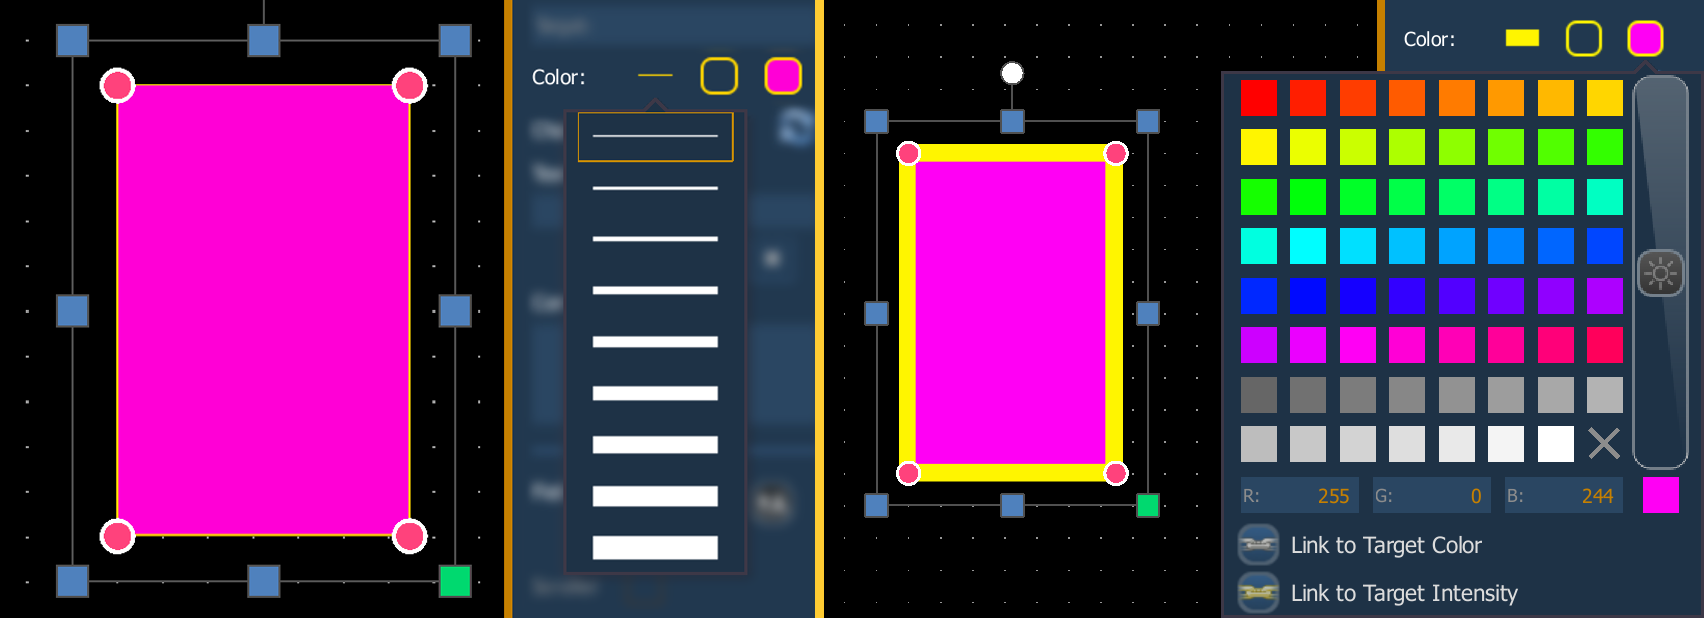
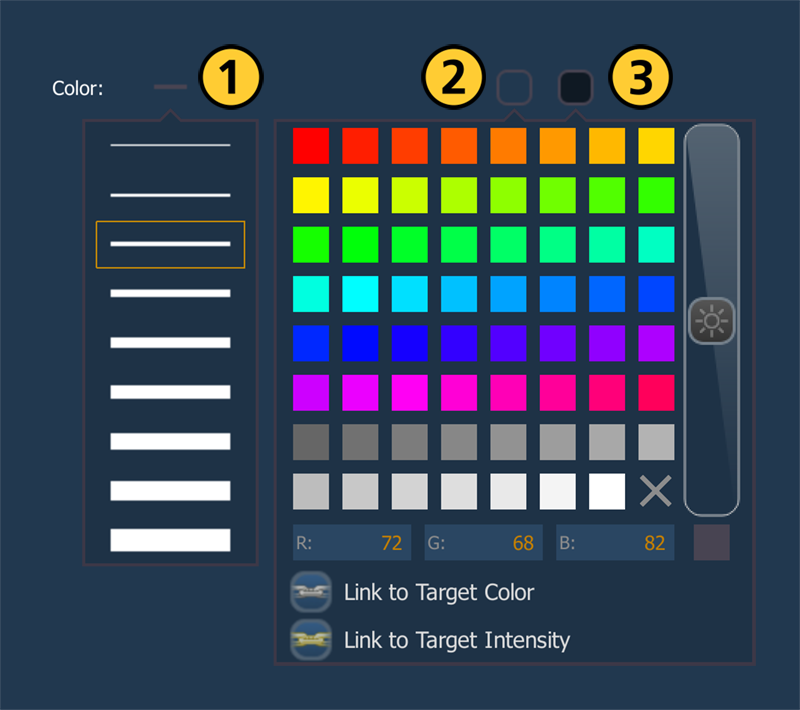
| 1 | {Outline Width} | Changes the thickness of the border around the object. Choose from the range of outline widths. |
| 2 | {Outline Color} | Changes the color of the object border. Choose from the available color swatches, or manually enter RGB values. |
| 3 | {Fill Color} | Changes the color of the object. Choose from the available color swatches, or manually enter RGB values. Use the {X} swatch to make the object transparent. |
Use the slider on the right of the color picker to make color options brighter or darker. You can also type in RGB values. The swatch in the lower right corner under the slider indicates the most recently chosen color.
Linking Color
The color picker offers the following additional options:
- {Link to Target Color} - if the target has associated color parameters (such as a channel controlling an LED fixture), this option associates the object's outline color or fill color with the live color of the target. If the target has no color parameters, the object color will appear as selected.
- {Link to Target Intensity} - if the target has associated level parameters (such as a channel controlling an incandescent fixture), this option associates the object's outline opacity or fill opacity with the live intensity of the target. If the target has no intensity parameters, the obj
If the target has no color or intensity parameters, the object color will appear as selected.
{Change Shape}
Allows you to quickly change the shape of one or more selected objects using the options in the Magic Sheet Object Library. Choose an option from the pop-up object library.
Fader Properties
These properties are unique to Fader objects and don't appear for other object types.
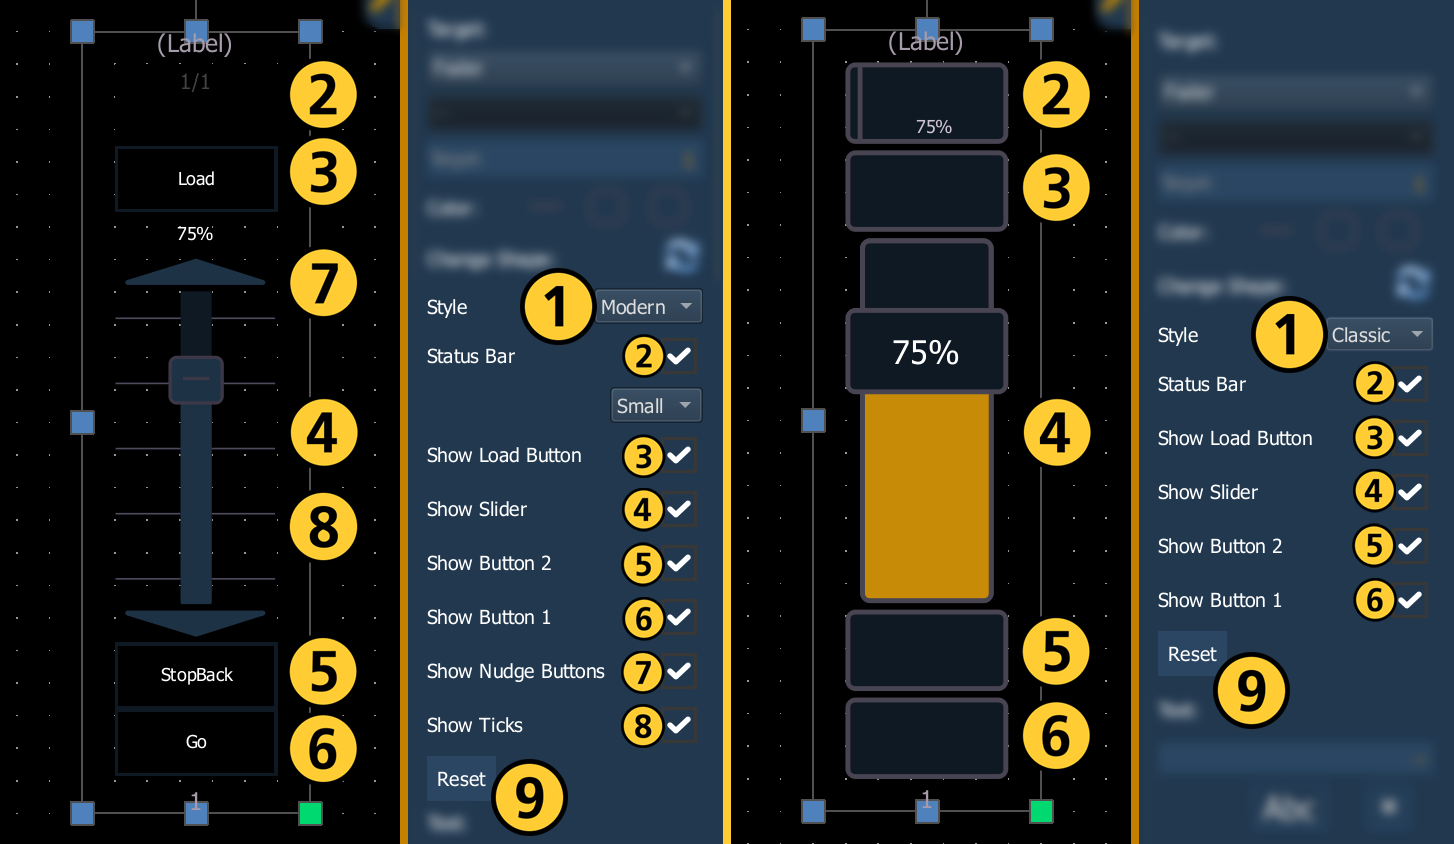
| 1 | {Style} | Toggles the visual style of the fader between Modern and Classic. Choose an option from the dropdown. |
| 2 | Status Bar | Toggles the status bar above the fader. Enabled by default. The dropdown menu below can be used to toggle the size of the status bar between Large and Small (default). |
| 3 | Show Load Button | Toggles the load button above the fader. Enabled by default. |
| 4 | Show Slider | Toggles the virtual fader control. Enabled by default. |
| 5 | Show Button 2 | Toggles the top button below the fader. Enabled by default. |
| 6 | Show Button 1 | Toggles the bottom button below the fader. Enabled by default. |
| 7 | Show Nudge Buttons | Modern style faders only. Toggles the triangular nudge buttons at the top and bottom of the virtual fader. Disabled by default. |
| 8 | Show Ticks | Modern style faders only. Toggles the horizontal lines behind the virtual fader. Enabled by default. |
| 9 | {Reset} | Returns the above fader properties to their default settings. |
{User Label}
This property is unique to Command Line objects and does not appear for other object types. Choose an option from the dropdown menu to display the user ID, user label, or both.
The following options are available:
- None
- User ID (Left)
- User Label (Left)
- User ID & Label (Left)
- User ID (Right)
- User Label (Right)
- User ID & Label (Right)
Text
Changes an object's text. Although primarily for use with Label objects, most object types can be given text.
Enter your desired text in the field. Object text appears within the object's interior, and cannot be positioned on the exterior bounds or shape of the object as Fields can.
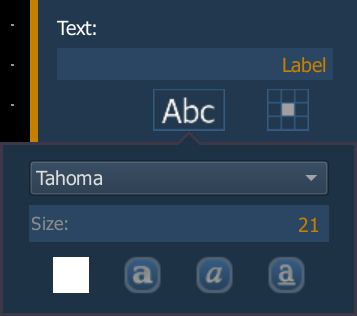
- {Font} - adjusts the appearance of the text. Use the pop-up menu to adjust the following properties:
- {Font} - changes the typeface. Choose an option from the dropdown.
- Size - adjusts the size of the text. Enter a font size in the field.
- Font size also adjusts the scaling of magic sheet icons.
- Size also adjusts any selected intensity bar and color swatch fields.
- {Color} - changes the color of the text. Choose from the available color swatches, or manually enter RGB values.
- Use the {X} swatch to make the object transparent.
- Use the slider on the right of the color picker to make color options brighter or darker.
- The text of channel objects on magic sheets will assume any colors assigned to that channel in Live/Blind, regardless of the color assigned in the magic sheet editor.
- {Bold} - toggles the text bold. Disabled by default. Can be combined with {Italic} and {Underline}.
- {Italic} - makes the text italic. Disabled by default. Can be combined with {Bold} and {Underline}.
- {Underline} - adds an underline to the text. Disabled by default. Can be combined with {Bold} and {Italic}.
- {Justification} - adjusts the position of the text relative to the object. Choose between {Top Left}, {Top Center}, {Top Right}, {Center Left}, {Center}, {Center Right}, {Bottom Left}, {Bottom Center}, and {Bottom Right}.
Command
Assigns a command to be executed when the object is interacted with. The target type needs to allow command options. Multiple commands can be entered.
Mousing over the command box will display a tooltip of the following command examples:
- Chan 1
- event: Go 0
- <U2>Chan 1
- macro:Tab_Down 2 7 Tab_Up
- udp:$Chan 1#
- /device/slider (button edges auto-inserted)
- /device/slider=1.0
- /device/slider=0/75 (up edge)
/device/slider=0.25 (down edge) - local:/eos/wheel/coars/pan=3.0
- udp:local:<U2>$Chan 1#
- local:/eos/chan/1=50
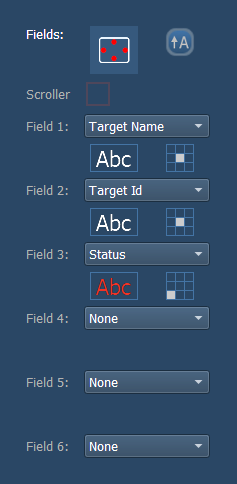
Fields
Fields are configurable displays of information that can be associated with an object.
{Orientation}
The orientation of fields around an object can be adjusted by pressing the field orientation icon.
The following options are available:
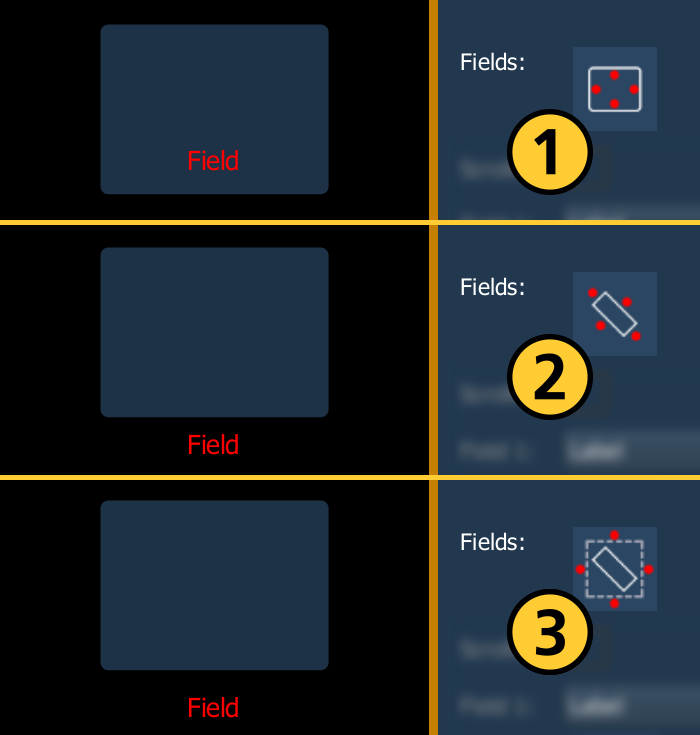
| 1 | Interior | Fields will be in the interior of the object. This orientation is useful for console buttons. |
| 2 | Exterior Bounds | Fields will be exterior to the object and will remain at a position regardless of the rotation of the object. |
| 3 | Exterior Shape | Fields will be exterior to the object and will move in relation to the object's rotation. |
{Keep Text Upright}
Toggles the upright orientation of any field text added to an object. Disabled by default.
When enabled, object edits with {Flip} that would typically rotate text with its object will only rotate the object. Text will remain in the original upright orientation.
Scroller
Adds a scroller indicator to Fixtures on your magic sheet. Enabling this option for other object types does nothing. Disabled by default.
{Field}
Up to six different fields of custom information can be displayed per object. These data options correspond to Choose a data option for the field to display using the dropdown menu.
- Active SK
- Address
- Alternate SK
- Beam
- Cell
- Channel
- Color
- Color Swatch
- DMX
- DMX Bar
- Fixture Type
- Focus
- Form
- Icon
- Image
- Intensity
- Label
- Next Move
- Notes
- Parameter
- Parameter Bar
- Patch Text
- Port/ Offset
- Prev Move
- Scene
- Shutter
- SK Number
- Status
- Summary
- Target Id
- Target Name
- Text 1 through 10
- Text Gel
- Value
Not all data options are available for all object types.
Field Text
Field text is tied to the field type and cannot be edited. The font, size, color, style, and justification for each field can be adjusted with the same options as the Text properties above.
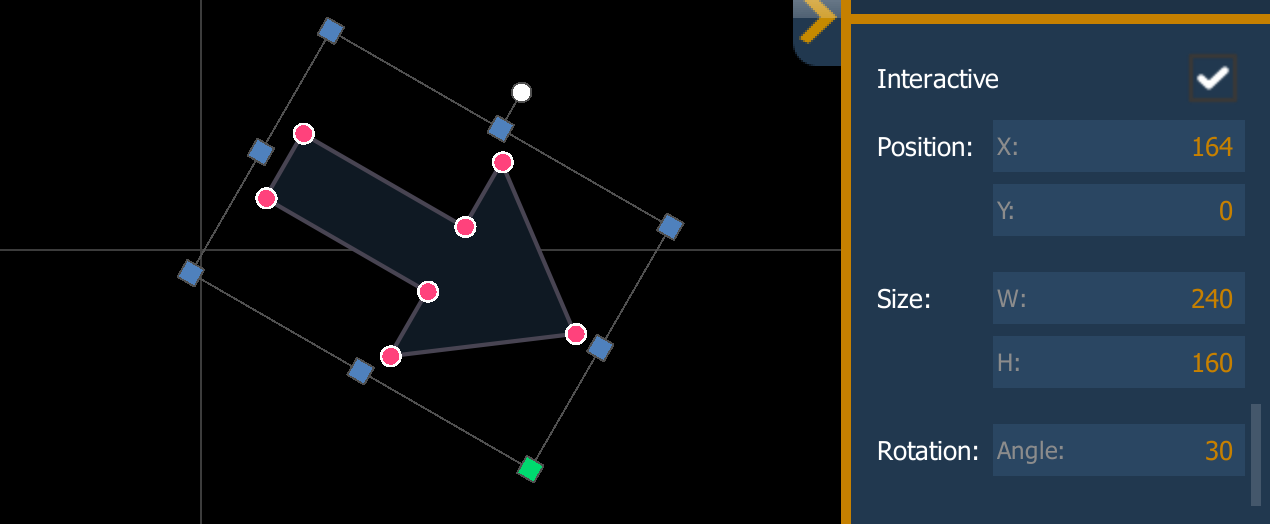
{Interactive}
Toggles whether or not the object is interactive. Interactive objects can be selected with a click or touch the same way as a direct select or virtual fader. Objects with disabled interactivity cannot be selected, and will only display information.
This option does not appear for inherently non-interactive objects (such as a Command Line).
Position
The position of the object on the magic sheet, relative to the center of the magic sheet at the intersection of the X and Y axes. Alter a selected object's position by dragging it around the magic sheet, or by entering specific X and Y values in the X and Y fields.
Size
The size of the object. Alter a selected object's size using the Object Handles resize options, or by entering specific width and height values in the W and H fields.
Although any object sizes can be entered, some object types (such as Tombstone objects) can only scale proportionally. Giving these objects non-proportional values will increase the size of the object's exterior bounds, not the object itself.
Rotation
The rotation of the object. Rotate a selected object in either direction using the Object Handles rotation option, or to the right (clockwise) by entering a degree value in the Angle field.