Editing Magic Sheets
Expand individual sections below to view more information, or use the Expand All button in the topic toolbar.
Objects can be added to a magic sheet, arranged, and edited using a mouse or touchscreen, along with the tools in the Magic Sheet Layout Toolbar.
Adding Objects
There are a variety of ways to add objects to a magic sheet, some of which can make it quicker and easier to arrange large or complex layouts. You can drag and drop objects onto the magic sheet, or you can use the Layout tools to create arrays of objects.
An actual size preview of the object will be overlaid on the magic sheet to assist with positioning.
Single Objects
- Select and Place - select an object in the Magic Sheet Object Library, then click or tap on the magic sheet to place it.
- Drag - select an object in the library and hold down to drag it onto the magic sheet.
Multiple Objects
- Quick Layout Mode - one of the layout Modes available in the toolbar, for quickly placing multiple instances of an object. Press {Quick Layout}, select the desired object in the library, and place the desired quantity of that object on the magic sheet.
- The Next and Increment fields in the target bar can be used to adjust the numbering of the new objects.
- Use the {Done} button or choose another layout option to exit quick layout mode.
- ALT - press ALT to load an instance of the most recently used object to the cursor for quick placement. Click or tap on the magic sheet to place the object, incremented based on the settings in the Target Bar. To place another of the same object, press ALT again to load another instance to the cursor.
- To place a different object type, select an object of that type in the library or on the magic sheet, then press ALT to load an incremented instance of that object.
Grid and Snapping
The {Grid Toggle}(CTRL+I) button on the Magic Sheet Layout Toolbar turns the default background grid off and back on.
When the grid is disabled, objects can be freely placed anywhere on the magic sheet.
When the grid is enabled, objects will snap to the grid. Hold down [Shift] or SHIFT while placing an object to bypass the snapping behavior.
Selecting Objects
There are two object selection modes based on the direction you move a mouse or tap and drag on a touchscreen.

The following options are available:
- Blue Selection (Left to Right) - selects objects that are completely inside the selection outline.
- Green Selection (Right to Left) - selects any objects within or touching the selection outline.
Selection Modifiers
The following modifiers can be used when objects are selected with a mouse:
- SHIFT + RIGHT MOUSE - adds an object to the existing selection.
- CTRL + RIGHT MOUSE - toggles selection of an object on and off.
- ALT + RIGHT MOUSE - cycles through any stack of objects that partially or completely cover each other.
Object Handles
The handles around selected objects can be used to alter their appearance.
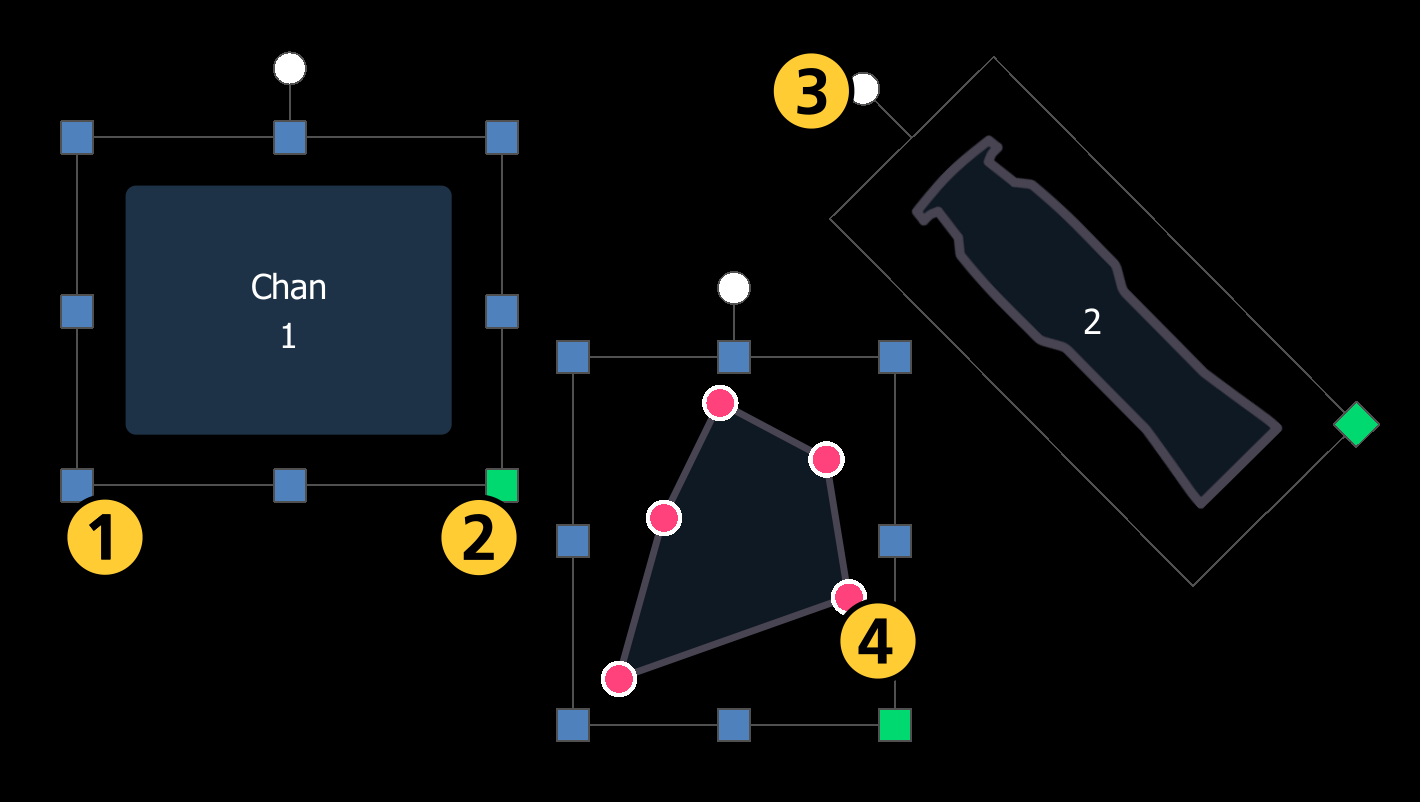
| 1 | Freeform Resize | Blue square handles around the selection. Ignores the original aspect ratio, allowing you to resize object dimensions individually. |
| 2 | Proportional Resize | Green handle in the bottom right of the selection. Scales objects up or down, preserving the original aspect ratio. |
| 3 | Rotate | White circle above the selection. Turns objects in a circle. |
| 4 | Reshape | Pink circles around the object. Shapes only. Alters the perimeter of shapes, allowing you to change the length and angle of each side individually. |
Adjusting the resize and rotate handles of one of the objects in a selection will resize and rotate all selected objects in unison. Only one object can be reshaped at a time.
Context Menu
The context menu offers quick access to standard object functions and tools from the Magic Sheet Layout Toolbar, and can be accessed by right-clicking, two-finger-tapping, or pressing and holding outside of any objects in the editor.
- Cut (CTRL+X) - removes selected objects for pasting.
- Copy (CTRL+C) - copies selected objects for pasting.
These options are related to the Layout tools on the toolbar.
- Paste Renumber (CTRL+SHIFT+V) - pastes cut or copied objects, incrementing their target numbers as defined by the Target Bar. The offset between any cut or copied objects is also maintained when pasted.
- Paste Duplicate (CTRL+V) - pastes cut or copied objects with the same target numbers as the originals.
- Renumber by click (CTRL+SHIFT+R) - floats a preview of the next incremented target number as defined by the Target Bar. Click on an object to change its target number. The floating preview will increment, allowing you to continue renumbering.
- Use the target bar to select the desired target type from the dropdown menu, editing the Next and Increment fields if necessary.
- Select any object on the magic sheet with the cursor to change it to the target type and number defined by the target bar. Selecting objects with no target type selected will remove their target.
- Use the {Done} button or choose another layout option to exit renumber mode.
- Renumber in item (CTRL+R) - opens a field on the object where you can enter a new target number. Press [Enter] or ENTER to confirm.
- Multiple objects can be renumbered at once by selecting them in order and pressing CTRL+R. Enter the starting number, press [Enter] or ENTER, and object numbers will be distributed in the order the objects were selected.
- Multiple channel objects can be given a starting number and an increment, separated by a forward slash (/). For example, five objects renumbered starting at 101/10 will receive the channel numbers 101, 111, 121, 131, and 141.
These options are related to the Group and Order tools on the toolbar:
- Group (CTRL+G) - associates multiple selected objects so that they can be moved and rotated like a single object.
- Ungroup (CTRL+SHIFT+G) - removes the association from any selected grouped objects.
- Bring Forward - moves the selection above the next object up.
- Send Backward - moves the selection below the next object down.
These options are also available:
- Clear Selection (CTRL+D) - deselects any selected objects.
- Grid Toggle (CTRL+I) - toggles the background grid off and back on. Also available on the toolbar.