Importing Show Data
Eos supports importing data into your show file from a variety of sources.
CAUTION: The way data is stored and used is often different between different consoles. Imported data may not playback exactly the same between consoles. Not all data (such as effects and macros) may be imported. This varies by product.
Formats
After choosing the appropriate option, navigate to the storage location of the file to be imported, choose the file, and press [Select]. Only files that can be imported will display.
USITT ASCII
Import ASC files, either in the standard USITT ASCII format or from Lightwright. When importing, choose from the following options:
- Import as Library Fixtures - allows Eos to try to match the fixtures in the file with fixtures in the Eos library.
- Import as Custom Fixtures - brings the fixtures in as they are in the file. Recommended.
Once a file is chosen, you can choose aspects of the file to import, similar to Merging Show Files. By default, the ASCII data will overwrite your current show data. If {Merge Data?} is selected, the ASCII data will be merged into your show instead.
Note: Eos supports ASCII show file import from a number of other control consoles, including the Congo/Cobalt, Obsession, Expression and Emphasis product lines, as well as the Strand 500 Series. Please note that all show files must be saved in an ASCII format prior to importing them into Eos.
Stamp
Import show data files output from the Stamp software.
CSV
Import CSV spreadsheets of show data.
CSV Pixel Maps
Pixel map fixture layouts and definitions can be imported for complicated pixel maps using specific CSV formatting.
- The CSV block must start with START_PIXELMAP and end with END_PIXELMAP
- The title row is required and must immediately follow START_PIXELMAP
- Columns may be in any order.
- Optional or Ignored columns may be omitted entirely.
- Either CHANNEL or ADDRESS must be present and nonzero.
- If CHANNEL is nonzero, a channel-type pixel will be imported, using the fixture profile attached to the Channel in Patch.
- ADDRESS, MANUFACTURER, FIXTURE_TYPE and FIXTURE_DCID are ignored.
- If CHANNEL is omitted or zero, an address-type pixel will be imported. The fixture type will be chosen as follows:
- Personality with matching FIXTURE_DCID
- Personality with matching MANUFACTURER and FIXTURE_TYPE strings.
- Generic Dimmer.
- If CHANNEL is nonzero, a channel-type pixel will be imported, using the fixture profile attached to the Channel in Patch.
- The (1,1) pixel location is in the upper-left side of the map. X increases moving right, Y increases moving down.
- SCALE_X and SCALE_Y default is 1, even if data is omitted. X increases a pixel size moving right, Y increases a pixel size moving down.
- Importing to a new Pixel Map target will make the map sized to fit the Pixel Data rows, based on maximum LOCATION_X and LOCATION_Y values.
- Importing to an existing pixel map target will import the pixels and preserve the existing pixel Map height and width.
Imported CSV Block Pixel Map Layout START_PIXELMAP
PIXELMAP,LOCATION_X,LOCATION_Y,CHANNEL
1,1,1,1
1,1,2,2
1,1,3,3
1,2,1,4
1,2,2,5
1,2,3,
END_PIXELMAPCH 1 CH 2 CH 3 CH 4 CH 5 CH 6
Pixel map fixture layouts and definitions are included when Exporting Show Data in CSV format.
Lightwright
Import TXT files from the Lightwright software. Lightwright ASC files must be imported using the USITT ASCII option.
Pixel Map Media
Import additional Pixel Map Media for use with pixel maps.
- Show Pixel Map Media - import all media needed for the current show file used by backup and client consoles.
- All Pixel Map Media - import all media.
Gobo Images
Supports all standard image formats except SVG for import as custom gobo images. Imported gobo images can be deleted via Browser > Import > Gobo Images > Imported Gobos, choosing the image, and selecting [Delete] [Enter].
Augment3d (From Vectorworks)
Legacy import from versions of Vectorworks prior to 2023 Service Pack 2 for use with Augment3d. See Vectorworks Augment3d Plug-in.
MVR / Capture Model
GDTF Fixtures
Import of General Device Type Format (GDTF) fixture profiles. Any included Color Configuration information will also be imported and added to the profile in Eos. GDTF fixture imports do not include 3D models for use with Augment3d.
Augment3d Scenic Models
Import models for use with Augment3d. See Importing Augment3d Objects.
Augment3d Scenic Materials
Import materials for use with Augment3d. See Importing Materials.
Import Options and Mapping
When importing certain file types, you will likely need to adjust the data before proceeding.
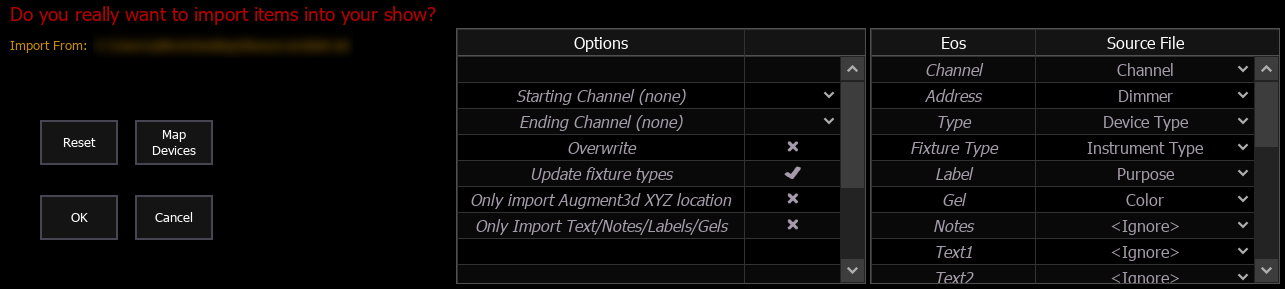
Options
The following options are available:
- Starting / Ending Channel - defines a specific range of channels to be imported.
- Overwrite - overwrites the data in the show file when enabled, and merges the data when disabled. Disabled by default.
- Update fixture types - enables or disables the update of fixture types in the show file. Enabled by default.
- Only import Augment3d XYZ location - enables import of just Augment3d location data. Disabled by default.
- Only Import Text/Notes/Labels/Gels - enables import of just the patch database text. Disabled by default.
Mapping Fields
You can map Eos patch fields to fields in the source file being imported. Channel and Address are required; any other field can be ignored if desired. Options can be selected again for placement in multiple fields.
The text fields in the Patch display and database will rename based off of the Lightwright imported fields. See Renaming Text Fields in Patch.
Note: Eos does not currently support multiple gels per fixture from Lightwright.
Address Formats
Eos can import addresses in both absolute and port/offset format. For example 513 or 2/1 are both valid formats for importing the first address of the second DMX universe. Eos will convert all formats to n/n.
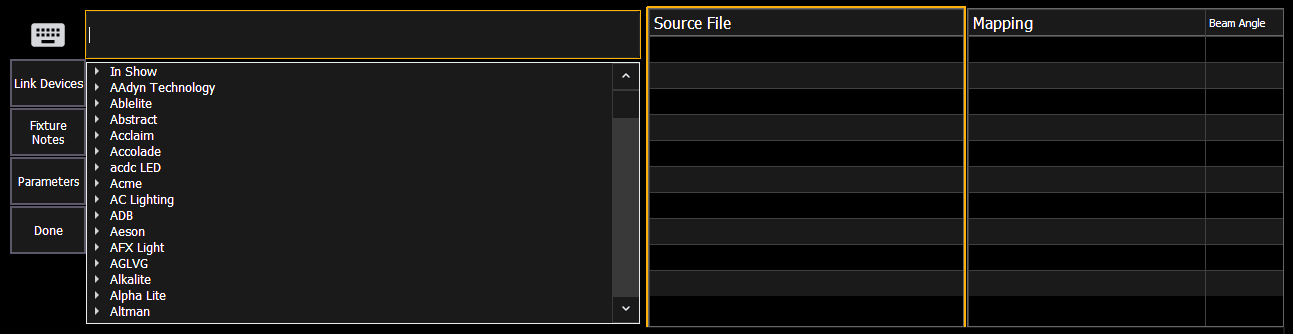
{Map Devices}
You can also map Eos fixture library devices to devices in the source file.
-
Select {Map Devices} to open the mapping utility.
- Select a device from the Source File column and choose its matching Eos fixture profile.
Multiple devices can be selected at a time.
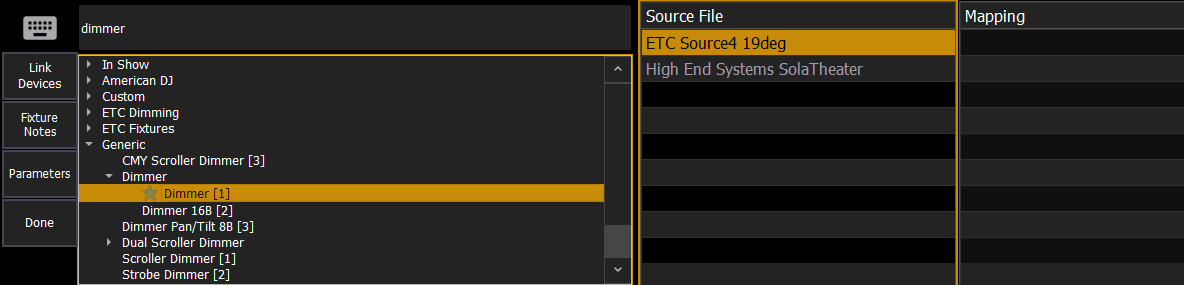
- Select {Link Devices}.
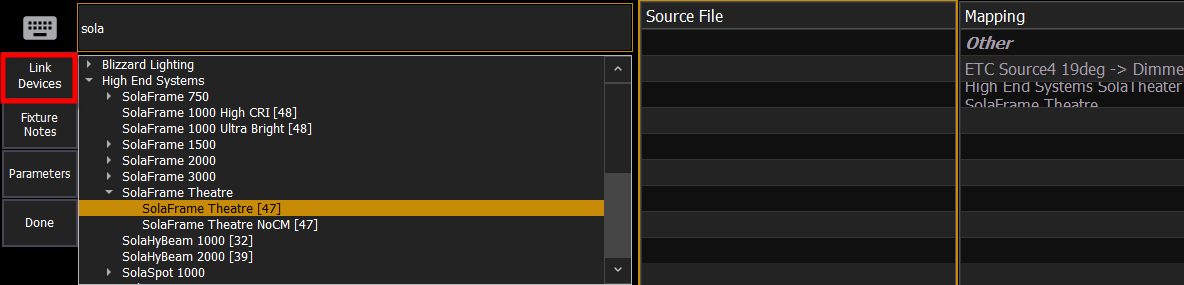
- Repeat steps 2 and 3 until all devices have been associated with fixture profiles. To unlink a device, select it in the Mapping column and select {Unlink Device}.
- When complete, select {Done}, then {OK}.
Device mapping and import fields are saved with the show file.