Magic Sheet Tab Configuration
Expand individual sections below to view more information, or use the Expand All button in the topic toolbar.
Tab configuration menus contain additional sets of context-specific options for a display. They can be accessed from the bottom of the Tab Tools by right-clicking or double-tapping either the tab or the gear icon to the left of the frame's tab bar.
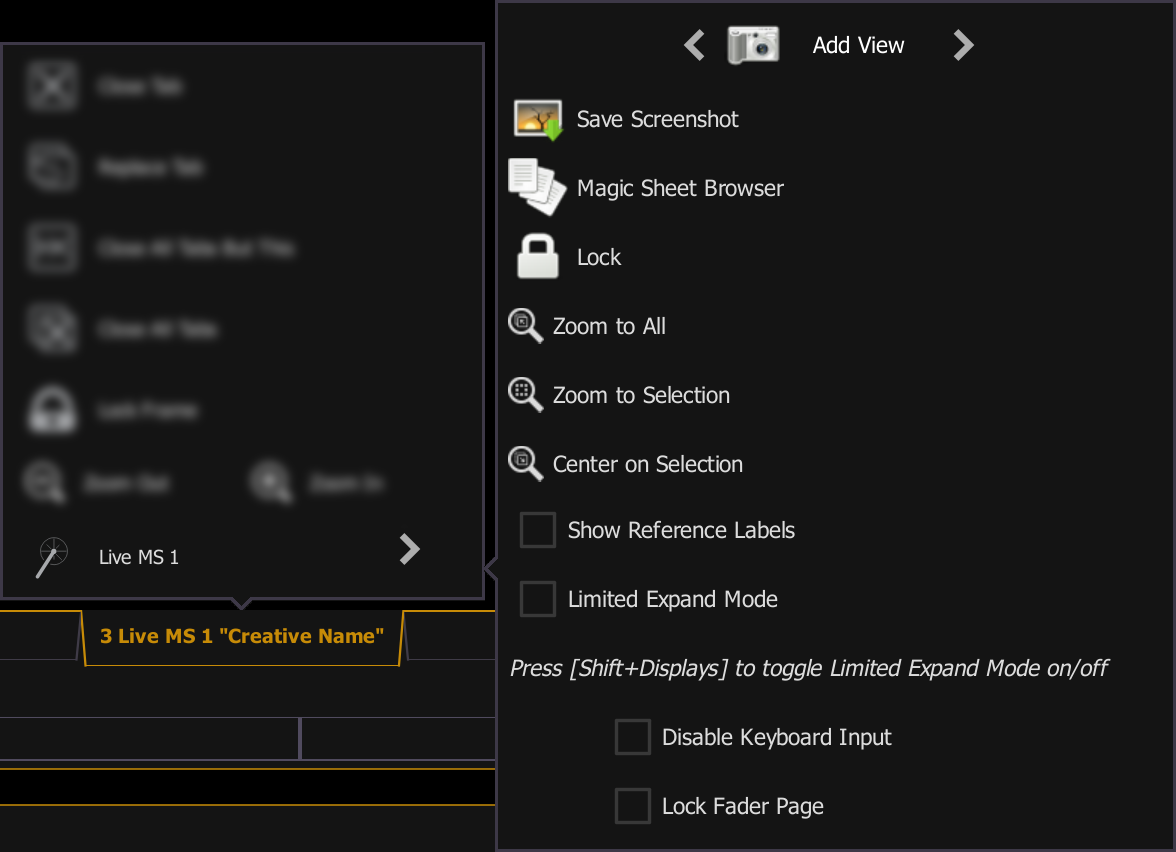
- Add View - different views of the same magic sheet can be saved and recalled. Zoom and pan the display to change the view, and then select {Add View} to save. To change views, use the arrows on either side, or Multi-Touch Gestures. You can also use {Magic Sheet} [Magic Sheet Number] [/] [View Number] [Enter] to open a specific view.
- For example, {Magic Sheet} [3] [/] [2] [Enter] will open view 2 of magic sheet 3.
- Save Screenshot - saves a screenshot of the magic sheet. Use the pop-up to select a save location. Choose to save in PNG or SVG format using the dropdown.
- Magic Sheet Browser - opens a pop-up magic sheet browser, which displays thumbnail images and labels for the created magic sheets. The browser can also be opened using Multi-Touch Gestures.
- Lock - locks the magic sheet so it cannot be zoomed or panned. This is useful for a customized direct select layout, where you want the buttons to always be in the same spot.
- Zoom to All - zooms to show all objects.
- Zoom to Selection - zooms to show all selected objects.
- Center on Selection - centers the display on the selected objects without changing the zoom level.
- Show Reference Labels - when enabled, channel objects that reference record targets (such as presets or palettes) with labels will have their labels displayed in the Magic Sheet rather than their target type and number. [About] & [Label] can be used to temporally toggle between views.
Limited Expand Mode
Limited expand mode allows magic sheets to be displayed fullscreen. While in this mode, the monitor with the magic sheet will not display a tab number, command line, or status bar, and other tabs open on the monitor will be closed or moved to a different display.
Magic sheets cannot be edited in limited expand mode.
Press [Shift] & [Displays] to enter or exit limited expand mode, or use the options in the tab configuration menu.
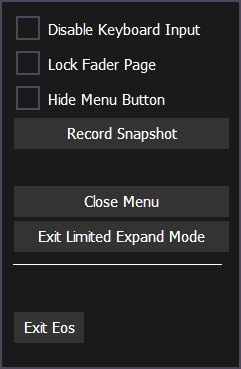
- Disable Keyboard Input - disables input from the face panel and external keyboards. Fader and macro button input is not disabled. Disabled by default.
- Lock Fader Page - locks the fader page to the currently displayed one. Disabled by default.
- Hide Menu Button - hides the Tab Tools gear menu. When the icon is hidden, [Shift] [Displays] is the only way to exit limited expand mode. Disabled by default.
- Record Snapshot - allows you to record Snapshots while in limited expand mode.
- Close Menu - closes the limited expand menu. The menu can also be closed by selecting anywhere on the magic sheet.
- Exit Limited Expand Mode - exits limited expand mode and returns to the full Eos user interface.
- Exit Eos - exits the Eos application to the ECU Welcome Screen.
Health Indicator
The monitor will display a three dot heartbeat indicator in the top right hand corner. The indicator will move between three dots to show that any Multi-Console Sessions are operating as expected.
The following indicator colors will be used for multi-console activity:
- Yellow - system is operating as expected.
- Red - master or backup has gone offline.
- Green - master or backup has reconnected.
- Gray - offline.