Cleaning Sensor Dimmer Rack Air Filters and Modules
Cleaning Rack Air Filters
Clean the air filter in the Sensor rack door a minimum of every six months, more often if your system operates in a dusty environment. This will also provide an opportunity to inspect the dimmer module air vents and clean them if necessary.
To clean your rack air filter:
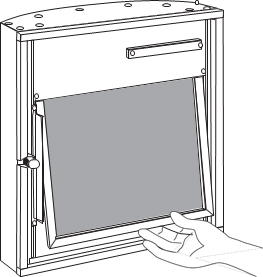
Step 1: Open the dimmer rack door. The air filter is mounted on the inside of the door, held in by a metal lip at the bottom of the door frame.
Note: Sensor 48-module racks have two filters, one stacked on top of the other with a retention bar in the middle of the rack. Remove the top filter screen before removing the bottom one.
Step 2: Slide the filter upwards approximately 1/2 inch (1.25cm) until the base of the filter clears the top of the metal lip.
Step 3: Pull the bottom of the air filter out and away from the door far enough to clear the retaining lip and slide the filter downwards and out of the door frame.
Step 4: In an area away from your dimmer rack and other dust-sensitive equipment, remove all dust or debris from the filter using either compressed air or a vacuum.
CAUTION: You may rinse the filter under cold tap water, but it must be completely dry before you reinstall it.
Do not use soap or other chemical cleaners to clean the filter. They may damage the filter screen.
Step 5: Slide the top of the filter up into the slot at the top of the door until the base clears the metal retaining lip at the bottom.
Step 6: Ease the filter back into the door frame and carefully let it drop back into place.
Note: For Sensor 48-module racks, install the bottom filter first. The top filter rests on the top edge of the bottom filter
Vacuuming Dimmer Modules
As with cleaning the air filters, you should inspect the dimmer module air vents and SCR power cube inlets every six months and clean if necessary, more often if your system operates in a dusty environment.
WARNING: To avoid the possibility of electric shock, power must be turned OFF when you perform this procedure. Before vacuuming dimmer or control modules de-energize main feed to dimmer rack.and follow appropriate Lockout/ Tagout procedures as described in NFPA Standard 70E. It is important to note that electrical equipment such as dimmer racks can present an arc flash safety hazard if improperly serviced. This is due to available large short circuit currents on the feeders of the equipment. Any work on energized equipment must comply with OSHA Electrical Safe Working Practices.
Do not remove dimmer modules when vacuuming. Phase voltages inside the rack can be deadly, therefore only qualified technicians should be allowed to remove modules and expose the inside of the dimmer rack.
To vacuum the dimmer module air inlets:
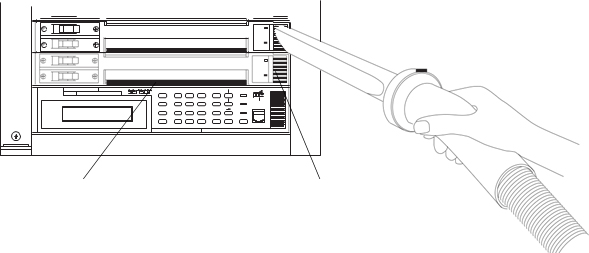
Step 1: Open the rack door and inspect the air vents on the CEM3 and the air vents and SCR power cube air inlets on the dimmer modules for any collection of dust or other debris.
Step 2: If necessary, use a vacuum cleaner and nozzle to remove any visible dust or other accumulated matter from the front of the modules without removing them from the rack. Most dust collects on the dimmer choke vents and SCR power cube air inlets of the modules (shown below).
CAUTION: Be careful not to push any foreign matter into the module.
Step 3: Close the rack door when you are finished vacuuming.
Cleaning Sensor CEM Processors
MPE, Sensor CEM, CEM+, and CEM3 modules should never be vacuumed. Instead, it is recommended that they are cleaned off using compressed air, the same that may be used for cleaning other electronics such as keyboards.
Step 1: Remove the control module from the rack:
- On a CEM Classic, slide out the center tab. Grasp with the thumbs and forefingers of both hands and wiggle the module out toward the front of the rack.
- On a CEM+, gently push on the latch at the bottom of the rack where the triangle indicates. Hook a finger into the handle once it extends from the rack and wiggle the module out toward the front of the rack.
- On a CEM3, pull down on the black latches on either side of the processor. Then, pull on those latches to remove the processor from the rack.
Step 2: While wearing safety glasses and following all safety procedures detailed by the canned air manufacturer, use canned compressed air to blow dust off of the circuit boards and out of the module.
Step 3: Reinstall the control module into the rack with firm pressure.
Step 4: Re-power the rack.
Video Explanation