Settings within the User Preferences window are stored per user as part of the show file. If a show has more than one user the console will prompt the operator to select a user when the show is launched. (see Users)
You can individually adjust the brightness of the console's desklights, worklight, and front panel key LEDs by holding down the Setup key and adjusting the coordinating parameter wheel.
The vent light brightness level on the Hog 4, Full Boar 4, and Road Hog 4 consoles is controlled by a slider that is located in the Appearance pane of the User Preferences window. The vent light will turn off during periods of console inactivity as determined by the Changing the LCD Backlight Timeout setting. Similar to the desk lights, the vent light will come on at full intensity on a cold boot before you have loaded a show file.
The desklights on most of the consoles in the Hog 4 family feature both blue and white LEDs, with the exception of HedgeHog 4 which only has white led desklights. By default the desklights are white during normal activity and turn blue during periods of inactivity as determined by the Changing the LCD Backlight Timeout setting. If you prefer the desklights to always be blue, you can select Use Blue Desklights in the Appearance pane of the User Preferences window.
You can adjust the brightness of each of the console's touchscreen backlights by holding down the Setup key and adjusting the coordinating parameter wheel.
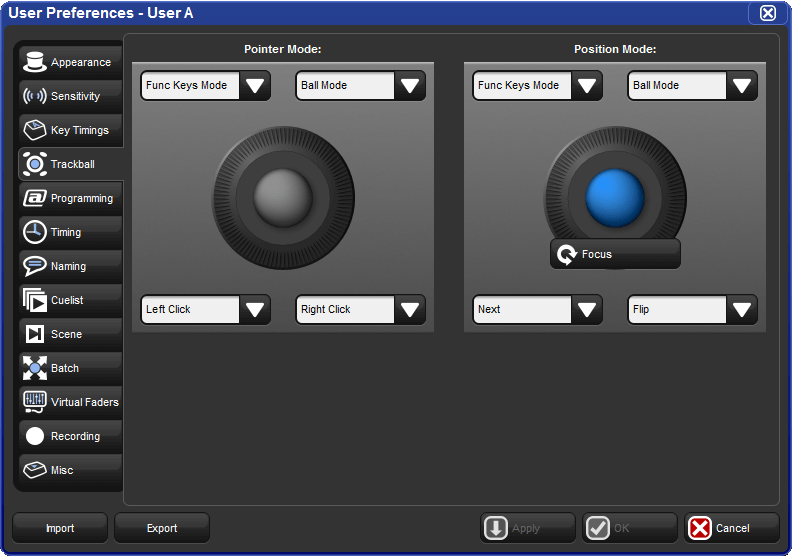
The Trackball and it's outer ring have two modes:
Pointer Mode: The trackball controls the on-screen pointer, like a mouse on a personal computer while the trackball ring acts as a vertical scroll wheel.
Position Mode: The trackball lights up in blue and controls the position (pan and tilt) of fixtures while the trackball ring controls whichever function is assigned to it in the Trackball tab of the User Preferences window.
You can switch between the two modes by pressing the top right Trackball key.
To lock the Trackball to one mode:
Setup → Preferences → Trackball
Select Pointer or Position from the drop down menu to lock the Trackball in that mode. Select Toggles to restore the ability to change modes with the top right Trackball key.
Select OK to apply and close.
![[Tip]](../images/tip.png) | Tip |
|---|---|
Make sure you have an external mouse connected if you lock the Trackball in position mode, and you don't want to control the on screen pointer only by pressing the touchscreens. |
You can configure the function of the four keys surrounding the Trackball according to the current mode (pointer or position). For example, in pointer mode you can have Right Click, Left Click, Flip and Ball Mode mapped while in position mode you could have Flip, Next, Ortho Toggle and Ball Mode mapped. The Trackball keys are assigned in the Track Ball pane of the User Preferences window; see Figure 4.3, “The Track Ball pane of the User Preferences window”.
The following navigation functions are available:
Ball Mode: switches the Trackball between position and pointer modes.
Ortho Toggle: switches the Trackball between Ortho and Normal. When in position mode, with ortho on, the Trackball will only control pan or tilt, not both at the same time. This can be useful for accurately setting fixtures.
Right Click: the same as a right-click with the mouse. This is usually used to bring up a contextual menu with commands such as copy and paste.
Left Click: the same as left-click with the mouse.
Open: mimics the open button on the front panel
Set: the same as the Set key, but closer to the Trackball for quick cell editing. (not compatible with trackball POS mode)
Close Window: closes the active window.
Toggle Kind Keys/Cmd keys: toggles the function keys between kind mode and command key mode.
In addition, the following fixture and playback functions are available:
Next: sub-selects the next fixture in the current selection. See Sub Selections.
Back: sub-selects the previous fixture in the current selection. See Sub Selections.
Select All: selects all the fixtures currently in the Programmer. See Select All.
Flip: changes the pan and tilt of a moving head fixture to point at the same position on the stage, but from the other end of its movement range. See Flip.
Fade Changes: toggles the state of the Fade Changes button in the active editor. See Fade Changes.
Next Page: advances to the next page in the page directory. See Changing Page.
Out: assigns the current selection's intensity to zero; see Intensity.
The default settings for the Trackball keys are:
| Trackball Key | Pointer Mode | Position Mode |
|---|---|---|
| top left | Funcs Key Mode | Func Keys Mode |
| top right | ball mode | ball mode |
| bottom left | left click | next |
| bottom right | right click | flip |
The user preference for which fixture functions are assigned to the center wheel on the front panel of the Hog 4 is managed in the Center Wheel pane of the User Preferences window. In this window you can assign as many functions as you like to the center wheel by dragging functions from left hand side of the window to the wheel display on the right hand side of the window. To delete functions from the center wheel click on the function in the right hand pane of the preferences window to highlight the function in blue and then press the delete key on the console front panel.
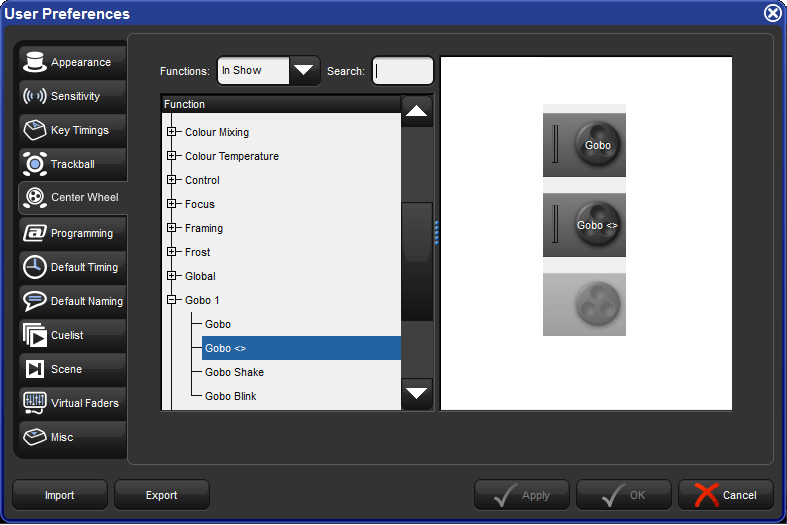
When a fixture selection is made functions assigned to the center wheel will be displayed on the toolbar located at the bottom of the front panel's center display. Functions that you've assigned to the center wheel will only be displayed if they are valid for your current fixture selection.
To cycle the center wheel through the functions press the button to the bottom right of the center wheel. The action of the button to the bottom left of the center wheel is determined by the Encoder Wheel Options preference (see See Encoder Wheel Button Options). The inner part of the center wheel acts exactly like the main encoder wheels on the desk. The outer spring loaded ring of the center wheel acts more like a shuttle whereby a move in either direction will initialize a value change at a fixed rate. The more you turn the ring the high the rate of change.
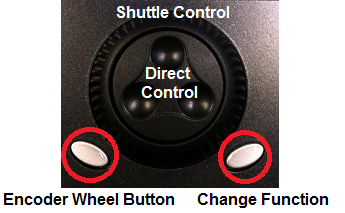
You can adjust the action that occurs when pressing the grey encoder wheel button (located to bottom left of each encoder wheel) in the Programming pane of the User Preferences window:
| Setting | Function |
|---|---|
| Fine Mode (default) | makes encoder wheel adjustments more refined (same as holding pig key) when encoder wheel button is held down |
| Cycle Feature Mode | changes the feature mode of the function assigned to the encoder wheel when the encoder wheel button is pressed |
| Set | opens a direct entry dialogue box for the encoder wheel when button is pressed (similar to holding set and turning encoder wheel) |
| Max/Min | sets wheel to max value when button is pressed first time; sets wheel to minimum value when pressed second time |
| Neg/Pos | sets wheel to negative value when button is pressed first time; sets wheel back to positive value when pressed second time |
| Adjust by One | increments wheel by one real world value when button is pressed (decreases wheel value by one when holding pig and pressing button) |
You can adjust various key timings in the Key Timings pane of the User Preferences window:
| Setting | Function |
|---|---|
| Key repeat delay | When you hold down a key, this is the delay before it starts to repeat. |
| Key repeat period | When you hold down a key, this is the time between repeats. |
| Key double press time | When you press a key twice within this time, the console interprets this as a double-press. |
Note: these timings only apply to the physical keys on the console's front panel, and not to the on-screen buttons.
| Tip |
|---|---|
Double-pressing a key is often a shortcut way of opening the window associated with the key; for example, double pressing the Beam key will open the Bean directory window. If you prefer not to use the double-press shortcuts, then assign the double-press time to zero to disable it. |
You can export the user preference settings as a separate file so that you can later import them into any show that you are working on. To export your user preferences:
Setup → Preferences : open the User Preferences window.
Click on the Export button, and select a location to save the preferences file to.
To load your preferences into the current show:
Setup → Preferences : open the User Preferences window.
Click on the Import button, browse to the location of your preferences files, and select a preferences file to import.