To power on and start up the console plug one end of a standard IEC power cable into any 100-220 VAC power source and plug the other end into the console's dedicated IEC power port and then turn the power switch on the back of the console to the on position. Make sure that any external bootable media such as bootable USB flash drives or CDs are removed from the console before booting as the console may try to boot to that media instead of to the installed operating system. When the console has finishing booting you will see the Hog 4 OS start screen. Your console is now ready for operation.
![[Important]](../images/important.png) | Important |
|---|---|
Using an ungrounded power source leads to a greater risk of shock and may cause the motorized faders on the Hog 4 and Full Boar 4 consoles to not function properly. Always make sure that the power source for your console is properly grounded. |
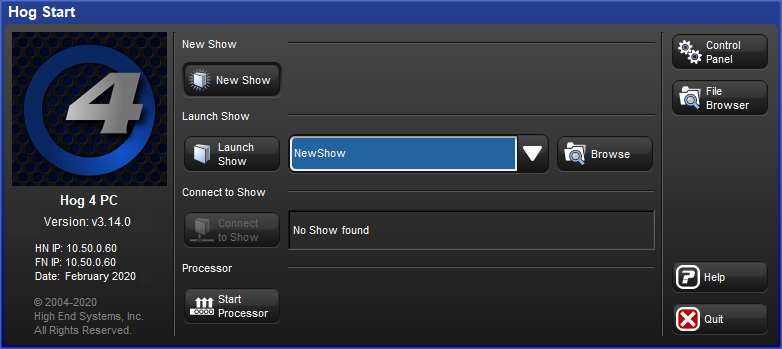
Pressing the button on the Hog start screen launches a processor on the console which enables the console to connect to shows on the HogNet network and utilize the console's hardware to provide DMX, ArtNet, and sACN output similar to the traditonal function of a rackmount DP8000. If a console is shut down, restarted, or powercycled while running as a processor the console will automatically launch the processor again when it boots. Processor mode is also available on Hog 4 PC but requires an ETC Nomad key or High End Sytems widget to license output.
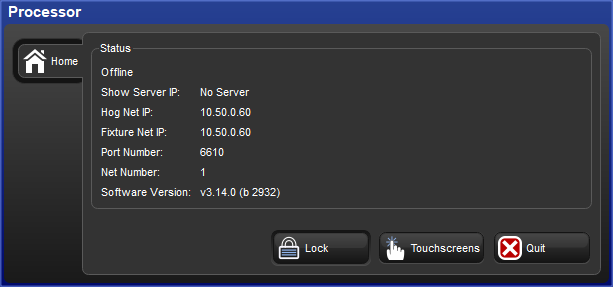
The processor window provides basic details about the processor's connection status, IP addresses, net number, port number, and software version.
To adjust the HogNet IP and/or FixtueNet IP of the processor:
Press the button on the processor window
Select from the Quit menu
Press the button on the Hog Start screen
Adjust the IP settings in the HogNet and FixtureNet tabs and press
Close the Control Panel window and press on the launch screen
The console will now run as a processor using the IP settings you specified.
To adjust the Port Number and Net Number of the processor:
Press the button on the processor window
Select from the Quit menu
Press the button on the Hog Start screen
Select the StartUp tab of the Control Panel.
Adjust the net number value located under the Processor section and/or adjust the Port Number value located under the Network section. When you are finished press
Close the Control Panel window and press on the launch screen
The console will now run as a processor using the settings you specified.
![[Tip]](../images/tip.png)
Tip The "run processor" option located in the console section of the start up tab in the control panel relates to whether or not a local processor will run when launching shows or connecting to shows on the console. This setting has no effect on the standalone "start processor" option.
To upgrade or downgrade the software version of the processor running on a console simply upgrade or downgrade the console as described in Console Software Update.
The number of universes each console is licensed to operate when running as a processor is shown the table below.
| Hardware Platform | Processor Mode Capability |
|---|---|
| Hog 4-18 | 16 Universes |
| Hog 4 | 16 Universes |
| Full Boar 4 | 12 Universes |
| Hog 4 PC | 12 Universes (must be licensed via Nomad Key or HES Widget) |
| Road Hog 4 | 8 Universes |
| HedgeHog 4X | 6 Universes |
| HedgeHog 4, 4N, 4S | 4 Universes |
The console has a built in clock which is shown at the far right end of the command line toolbar. To change the console's date, time, and time zone open the Control Panel and navigate to the Time and Date tab. To change the format in which the console displays the date and time in your show file open the Preferences window and navigate to theAppearance tab. The format preference is stored in the show file and will change based on which show file you load.
Note: In order to permanately store changes made to the time and date of the console you must restart the Hog 4 OS or properly shutdown/reboot the console. Simply switching the console's power switch off/on will result in any time and date changes being lost.
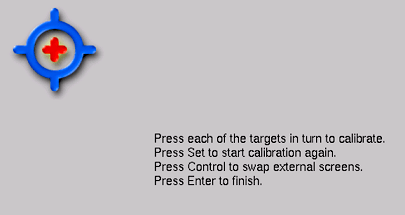
The touch screens may occasionally need to be calibrated. To recalibrate the touchscreens before launching a show, select the Touchscreens button in the Start window. Touch each target as it appears sequentially; see Figure 3.3, “The Calibration Screen”. After the calibration sequence is complete, press Enter. You can press the Set key to start the process again if necessary. You can also calibrate the touch screens at any time while loaded in a show by pressing the Calibrate Touch Screens button in the Displays pane of the Control Panel. Users can also start the touchscreen calibration at any time on their console by holding the Setup key and pressing the encoder wheel button below the first main encoder wheel.
You can adjust the brightness of the built-in touchscreens by adjusting the LCD backlight settings of the console (Hog 4 and Full Boar 4 only). To adjust the LCD backlight hold down the Setup key and adjust the parameter wheels labelled Left Backlight or Right Backlight.
| Tip |
|---|---|
If you find the graphics on the screens are too bright, you can change the console's colour scheme to a darker one in Setup → Preferences → Appearance. |
The backlights that illuminate the console's primary touch screens switch off automatically after a period of time if the console is idle. You can adjust the amount of time the backlights will wait before switching off in the Appearance pane of the User Preferences window:
Setup → Preferences → Appearance
Adjust the Backlight Off time located at the bottom of the pane, either by pressing the arrows to increment or decrement the value, or by clicking on the value, pressing Set and typing in a new value.
Select OK to apply and close.
| Tip |
|---|---|
Once the Hog displays are asleep you can wake them up by pressing any key. It is a good idea to use the Pig key as this will prevent you from accidentally changing any data within the show. |
A wide variety of external displays and USB touchscreens are supported by Hog 4 series consoles. When an external touchscreen is required High End Systems recommends using Master Wing 4 or Playback Wing 4 for the greatest level of compatability and integration.
For stand-alone touchscreen monitors High End Systems recommends using plug'n play "Windows Compatible" touchscreens that do not require proprietary drivers.
The touchscreens listed below have been tested for compatibility by High End Systems:
| Manufacturer | Model | Size | Part Number |
|---|---|---|---|
| Acer | T232L | 23" | UM.VT2AA.001 |
| Acer | T230H | 23" | ET.VT3HE.001 |
| Dell | P2314T | 23" | 1RNV2 |
| Dell | E2014Tt | 20" | E2014Tt |
| Dell | S2240Tb | 21.5" | 09XJW |
| Dell | P2418HT | 23.8" | P2418HT |
| ELO | AccuTouch ET1229L | 12" | All Part No. |
| ELO | AccuTouch ET1215L | 12" | E432532 |
| ELO | AccuTouch ET1725L | 17" | E103047 |
|
ELO | iTouch ET1519L | 15.6" | E232070 |
| ELO | iTouch ET1919L | 18.5" | E176026 |
| ELO | Intellatouch Plus ET2201L | 22" | E107766 |
| GeChich | on-Lap 1303i | 13.3" | 13031000109 |
| Hannspree | HT225HPB | 21.5" | HT225HPBREJ01 |
| iiyama | Prolite T2252MTS | 22" | PL2252MT |
| iiyama | Prolite T2235MSC | 22" | PL2235M |
| Lenovo | T2364t | 23" | T2364t |
| VIEWSONIC | TD2340 | 23" | VS15023 |
To connect an external display and/or touchscreen to your console:
Power off the console.
Connect the external display's video signal cable to one of the video output connections on the back of the console. A video adapter may be required (see tip below).
If using a touschscreen: connect a USB cable from the touchscreen to one of the USB ports on the console.
Turn on the console.
In most cases each external monitor's native resolution will be detected by the console and no further adjustments to resolution will be required. In cases where the external monitor's resolution is not properly set automatically, press the button on the start screen to open the control panel.
Select the "displays" tab of the control panel. Use the appropriate drop down menus to select a custom or preset monitor resolution, orientation, and/or position for the external display and then press the button.
If using a touchscreen: press the first encoder wheel button while holding down the key on the front panel. This will start the touchscreen calibration utility.
Touch all of the calibration targets on both the internal and external touchscreen displays. Once calibration is complete the cursor should follow your finger on both the internal and external touchscreen displays.
| Tip |
|---|---|
The Hog 4-18 display port output connections are compatable with native display port displays as well as with ACTIVE display port video adapters. The Hog 4-18's display port outputs are NOT compatible with PASSIVE display port video adapters. The Full Boar 4’s DVI-D output connections do not support analog output to VGA displays such as those featured on the older Full Boar 3 playback and programming wings. The Road Hog 4's VGA output is not supported. Although some VGA monitors may work on this port it is advised to only use the DVI-D output on the back of the Road Hog 4. |
You can connect an external keyboard to the console via the console's USB ports. Choose a keyboard model, and assign the keyboard layout according to the language of the keyboard you have connected, in the Keyboard pane of the Control Panel.
You can adjust the timings for Repeat Delay, Repeat Period, and Double Press in the Key Timings pane of the User Preferences window.
| Tip |
|---|---|
You can use an external keyboard to control many of the console's functions, as well as entering numbers and text; see QWERTY Keyboard Shortcuts. |
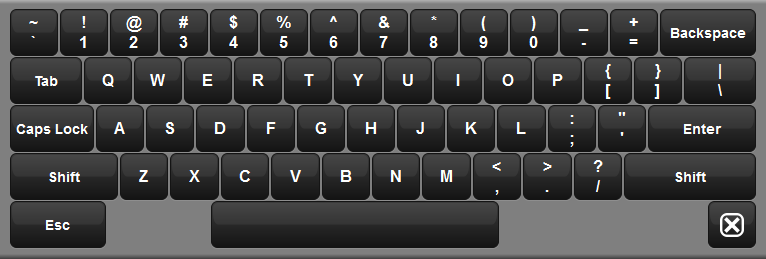
You can use the on-screen keyboard to enter text when an external keyboard is not present. When prompted to insert text, press the Set key to launch a touch-screen keyboard. You can use the Pig key as a 'shift' for uppercase characters. Press the Enter key when you have finished typing. To close the on-screen keyboard without making any changes, press Set instead of Enter.
External USB trackballs can be connected to the console via the console's USB ports. Most external USB trackballs are supported only as an external mouse with left and right click capabilities however a select set of trackballs (listed below) are fully supported as functional Hog 4 OS trackballs (support for all four trackball buttons and support for the use of the trackball in both pointer and POS mode):
Kensington Expert Mouse (Model K64325)
Kensington Orbit Wireless Mobile Trackball (Model K72352US)
Kensington SlimBlade Trackball (Model K72327US)
To properly shut down or restart the console while running a show: Setup → Quit and select one of the options in the quit pop-up menu:
Shut Down: Shutting down the console exits the software completely. All Art-Net, sACN, and 5-pin DMX transmission from the console is completely turned off. Processors attached to the show will stop transmitting Art-Net and sACN but will continue to output 5-pin DMX at a low 2 Hz refresh rate until they are powered off. Please note that shutting down the console does not power off the desk. To completely turn off the console's power flip the power switch to the off position. For HedgeHog consoles press and hold the power switch for 3 seconds. If the console is shutdown while running in "processor mode" then it will return to processor mode when rebooted.
Restart Console: Restarting the console exits the Hog software completely, resets the computer, and re-boots the console to the start window. All Art-Net, sACN, and DMX 5-pin transmission from the console is turned off. Processors attached to the show will stop transmitting Art-Net and sACN but will continue to output DMX 5-pin at a low 2 Hz refresh until powered off or loaded into another show. If the console is restarted while running in "processor mode" then it will return to processor mode when it finishes rebooting.
Log Off: Log off closes the current show file and returns to the user to the start window. If the console is in processor mode then logging off will return the user to the start window. The contents of the programmer as well as any cuelists or scenes that were active in playback will continue to output from the 5-pin DMX outputs of the console and processors at a low 2 Hz refresh rate until you log onto another show or until the console is powered off. Art-Net and sACN transmission is completely turned off on the console and processors upon log off.
In all cases your show data is automatically saved to disk.
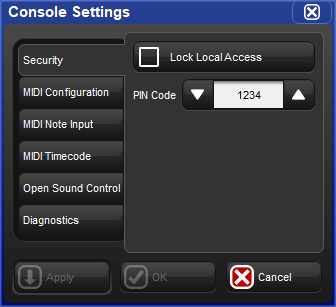
Consoles can be locked for access while a show is loaded by hitting the setup key on the console front panel and then pressing the lock button on the quit toolbar. Consoles can also be locked remotely by enabling the "lock local access" button under the security tab of the console settings window for the console on the network you wish to lock.
When the console is locked the user cannot access any part of the show file or change any dmx output to the stage. To unlock the console enter the PIN code you have setup for your console using the touch screen, the numeric keypad on the front panel, or an external keyboard. When a custom lock image is used the onscreen keypad will auto-hide after a few seconds. If the onscreen keypad is not shown on the displays then press the pig key on the console's front panel or the Ctrl key on the keyboard and the onscreen keypad will reappear.
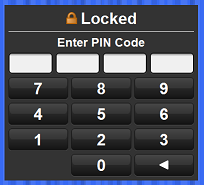
By default the lock code for consoles is 1234. To change the lock PIN code for the console open the network window, right click on the console you want to change the settings for, click on settings, and navigate to the security tab. Change the PIN code to the desired value and hit apply.
If you forget the passcode and are locked out of the console you will need to powercycle the console and relaunch the show in order to regain access to the show. Lock pin codes are stored per show and per console.
To specify a custom lock screen image:
Open the Control Panel and select the tab.
Press the button.
Choose an image file using the file browser window that pops up and then press .
The following formats are supported for custom lock images: JPEG, PNG, and BMP.
High End Systems recommends the following image resolutions for each console:
| Hog 4-18 | 1920 x 1080 |
| Hog 4 | 1280 x 768 |
| Full Boar 4 | 1366 x 768 |
| HPU | 1600 x 480 |
| Full Boar 4 (2016 and later model) | 1920 x 1080 |
| Road Hog 4 | 1680 x 1050 |
| HedgeHog 4 | 1280 x 800 |
To revert the console back to the standard lock screen image press the button in the displays tab of the control panel. Custom lock screen images are stored per console and persist for all show files loaded on the console. Lock screen images are NOT stored per show.