Preset and Palette Fader Properties
Presets and palettes can be mapped to faders by using the fader configuration display. For information on how to use the fader configuration display to map faders, see Fader Configuration [Tab 36]
The fader configuration display is found on Tab 36. The Fader List [Tab 35], which shows all of the faders and their assignments, can be found in Tab 35.
Click or tap the second row of the fader page to access this properties display.
The following options are available when a fader is configured as a preset or palette fader:
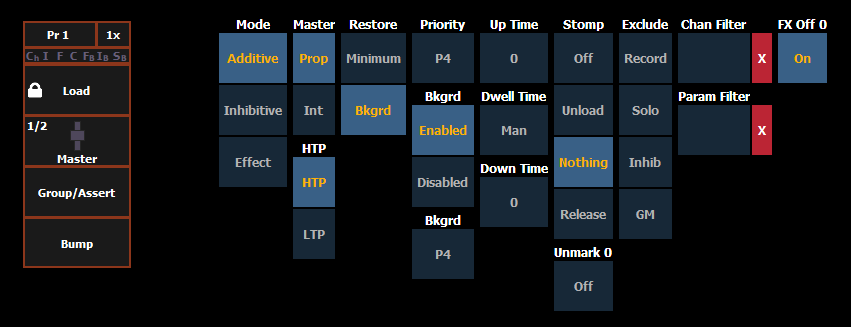
Mode
You may define your fader as additive (contributes to the live output), inhibitive (limits live output) or an effect fader (presets only).
Master
A fader can be assigned as a Master. When it is a master, its behavior as a Proportional Master or Intensity Master (I-Master) is drawn from this setting.
HTP
Intensity playback behavior can be set to HTP (highest takes precedence) or LTP (latest takes precedence).
Restore
Faders can be placed into restore modes of minimum or background, which is the default. When a fader is in the restore to background mode, the restore column of the fader list display will be blank. When in minimum mode, 'Min' will display in the restore column.
The restore mode of background means that when the fader is returned to zero, control will be restored to the background value, such as another fader or a cue.
The restore mode of minimum means that when the fader is faded down, control does not go to the previous background state but to the parameters’ minimum value.
Priority
The Independent setting for faders has been changed to priority. There are 10 levels of priority for faders. 1 is the lowest and 10 is the highest. Faders can still be shielded, which means that their content is automatically made exclusive and can't be controlled by anything other than that fader and park, including by manual control. Shielded has a higher priority than 10.
Background
Faders can have their background states disabled. Background states are enabled by default. When enabled, the content of the fader will act as a background or previous state for other cues and faders.
Background Priority
Background can have a priority assigned to it.
In previous software releases, when content was released, it always returned to the last fader that owned it. Background priority releases to the highest priority content that previously had ownership, provided that content has not be turned off or released.
There are 10 levels of background priority for faders. 1 is the lowest and 10 is the highest. When LTP content is released to background, it will go to the background state with the highest available priority.
Up Time
This is the time for the fader to fade from its home position to its target position (0 to Full if additive, Full to 0 if inhibitive). The default time is 0.
Dwell Time
This is the time the fader look will hold before starting the downfade. This can be set to a specified time, or to “Hold” or “Manual”. “Hold” time maintains the fader values until the bump is pressed a second time. “Manual” time applies the fader values only as long as the bump is held. The default is “Manual”.
Down Time
This is the time for the content on a fader to fade from its target position to its home position. The default time is 0.
Stomp Mode
Stomp happens when all the content owned by a fader is now being controlled by other targets. The fader is being removed from the background , and once that happens, it would not be eligible to fade back. You can assign behavior that will happen when a fader is stomped.
- Off When Stomped - puts the content into an off state, the same behavior encountered when pressing [Off] + [Load].
- Unload When Stomped - unloads the fader.
- Nothing When Stomped - no action happens to the fader.
- Release When Stomped -This function behaves the same as Off When Stomped.
Unmark at 0%
When this option is on, marked content controlled by the fader will automatically be released when the fader reaches 0%. When the bump button is next pressed, the fader will fire. If this option is off, you would need to first press the bump button to reset the fader before pressing the bump again to fire it.
Note: This option is for faders that are set to Intensity Master.
Exclusions
Those exclusions include:
- Exclude From Record - output is not recorded into any other record target.
- Exclude From Grandmaster - content cannot be mastered by a grandmaster.
- Exclude From Inhibitive Sub - content cannot be mastered by an inhibitive submaster
- Exclude From Solo - content will ignore solo. See Fader and Button Configuration.
Channel and Parameter Filters
Channel and Parameter Filters can be used to allow only specified data to be played back. These are playback filters, and do not impact how data is recorded.
Tap or click on {Chan Filter} to assign channels or groups. Tap or click on {Param Filter} to open a list of available parameters that you can filter.
When a filter has been applied, an indicator will display in the fader ribbon. C will display for channel filter, and F is for parameter filter.
Press the red [X] to clear the channel or parameter filters listed.
Fader and Button Configuration
Click or tap on the virtual buttons or fader to see a list of available configuration options.
Button Options
The following options are available for fader buttons:
- Bump - plays back the content at 100% of the recorded level. It will continue to do so until released, unless the fader has a time assigned or the {Hold} property set.
- Group/ Assert - selects all the channels associated with the fader, if the fader is inactive. If active, the contents of the fader will be asserted.
- Assert - regains control of all of the channels associated with the fader.
- Group Select - selects the channels stored in the fader. This is the same as [Group] [Sub] [n].
- Freeze - halts all effect activity on the fader.
- Off - removes the content and if the fader is set to Master, the fader will remain where it currently is.
- Release - removes the content and if the fader is set to Master, the fader will reset to 0.
- Start Stop Effect -starts the effect while ignoring dwell times. Will stop effects if any are running.
- Button Disabled - no action is assigned to the button.
- Solo - suppresses any intensity values not provided by the associated content while the solo button is held down. When the button is released, intensity values are restored. Priority and HTP are ignored. Shielded, park and pixel mapping outputs are not affected by the solo button.
- Back - fades to the previous cue when fader is assigned to a cue list.
- Macro - allows you to assign a macro as a button action.
Fader Options
The following options are available for a fader:
- Master - fader will be a proportional master, a manual master, or an intensity master.
- Effect Rate - fader centers to home. It controls the rate of any running effects (same behavior as using rate via the Effect Status Display). The adjusted setting from this control cannot be stored.
- Effect Size - similar to Effect Rate but for effect size.
- Rate Master - homes to center. It adjusts the cue rate, just like rate and load.
- Fader Disabled - no action is assigned to the fade.
- Master Only - fader is used to set a level for content to fade to. The slider can be used to live adjust levels when the fader has been activated via the bump button. See Master Only.
- Effect Master - masters the entry/exit mode of the effects (size, rate or both).
- Levels Only - masters the levels without mastering the effect.
Temporary Fader Mapping
Presets and palettes can be used to create a temporary list of content that can be played back on a fader.
Note: This list is not recorded. If the fader is unloaded, the list cannot be recalled.
To create a list, press the [Load] button of an unmapped fader. You can then select presets or palettes to add to your list either by the command line or from the direct selects.
- [Load] {DS 1} {DS 2} {DS 2} [Enter]
- {Fader} [1][0] [Preset] [1] [Preset] [2] [Preset [3] [Enter]
Once mapped, the fader will default to Master Only mode. See Master Only.
The list will use the timing assigned to the fader.
A fader with temporary mapping will have the cue list options for Back From First and Go From Last. See Cue List Properties.
The list of targets will display in the Fader Configuration List (Tab 36), in the Fader List (Tab 35), and in the Fader Ribbon.