Panel Setup
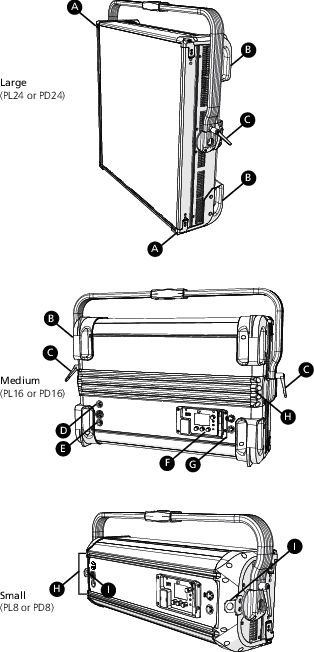
| A | Accessory holder: Insert accessories into the two available slots from either side of the holder, and then lock the holder. |
| B | Handles: For medium (PL16 or PD16) and large (PL24 or PD24) fixtures, carry the fixture by the pairs of handles on the back of the fixture, and attach safety cables to handles when mounting the fixture. |
| C | Yoke tilt-lock: Tilt the fixture as needed, and then turn the tilt-lock clockwise to lock the position. If necessary, pull the tilt-lock away from the stem to adjust the tilt-lock position. |
| D | Battery connector: |
| E | Power In and Power Thru connectors: powerCON® TRUE1 TOP connectors for power in and thru. |
| F | User interface: View the fixture status, set the DMX address and mode, or set stand-alone options. |
| G | DMX In and DMX Thru connectors: Five-pin XLR connectors for DMX/RDM in and thru. |
| H | Griprail: Attach standard accessories and mounting hardware to the back of the fixture using the hardware provided with the accessories or using M6 standard T-nuts. |
| I | Safety cable attachment points: Small (PL8 or PD8) fixture only. For large and medium fixtures, attach safety cables to handles (B), either the top pair or the bottom pair. See Mount the Fixture. |