Effects can be used to create a repeating change or ‘movement’ in the value of fixture parameters. Effects are recorded as part of cues, scenes and palettes.
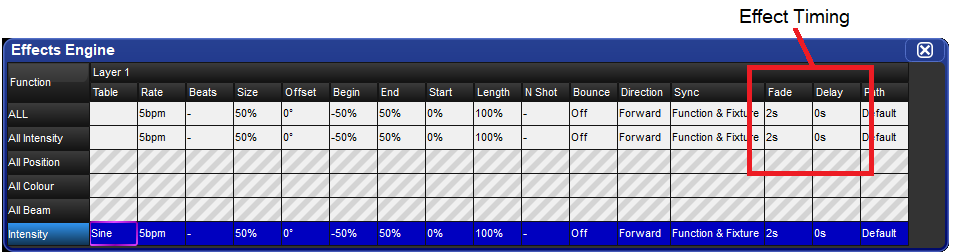
Table effects are effects applied to fixture functions using wave tables that apply mathematical functions (such as sine or tangent) to values against time. Table effects have seven main attributes: table, size, rate, offset, length, bounce, direction, and sync. Each effect table also has its own timing parameters for fade, delay, and path.
There are three ways to apply table effects to a fixture selection:
Predefined Effect Palettes: A range of pre-programmed effects can be found in the effects directory window that can be quickly applied and then tweaked if desired
The Effects Engine: A special editor window where users can assign and edit the effects values for the current fixture selection.
Using the Programmer / Cue Editors: You can assign and edit effects values for specific fixture in editors such as the programmer just as you do with other values.
One of the main components of a table effect is the effect table iteself, which applies a mathematical function (such as sine or tangent) to the parameter values. The available tables, and how the parameter value varies over time,are shown in Figure 14.1, “Effect Tables”.


Note that the effects table varies the value of the parameter either side of its base level, represented by the dotted line in the diagrams. The three types of random table are weighted differently, biasing the random parameter values towards the low, high or middle part of the possible range.
Listed below are examples of combinations of effects tables in use:
Circular Motion: A Sine table is applied to pan and tilt, with tilt given an Offset of 90 degrees.
Square Motion: A Sawtooth table is applied to pan and tilt, with tilt given an Offset of 90 degrees.
Can-Can Motion: A Step table is applied to pan, a Sine table is applied to tilt.
Fly In Motion: A Step table is applied to pan, a Ramp table is applied to tilt.
Blue Step Colour Effect: A Mark On table is applied to cyan and magenta.
Iris Chase: A Sawtooth table is applied to the iris.
![[Tip]](../images/tip.png) | Tip |
|---|---|
You can create many of these useful combinations of tables using the predefined effects palettes; see Predefined Effect Palettes. |
The appearance of the effect table through a combination of adjustments to its attributes: rate, size, offset, begin, end, start, length, direction, bounce, and N-shot.
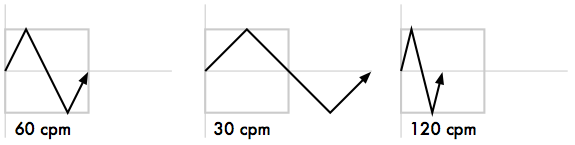
The effect rate controls the speed of the effect in cycles per minute assuming the master rate is set to 100% rate.
Adjusting an effect's rate will increase or decrease the number of cycles it completes per minute. When combining effects, you can use the rate attribute to build a specific look. For example, if you create an effect where a fixture performs a circular motion fading in on the first circuit, out on the second, then the effect on the intensity parameter would need to be half of the rate on the position parameters.
The following diagram shows how the value of a parameter assigned to the sawtooth table changes over time, with different rate values:
The beats parameter of an effect represents how many beats it takes to complete the effect cycle. The beats parameter is only meaningful when programming effects into masters where effect tempo is used. A larger beat value results in fewer effect cycles at a given tempo whereas a smaller beat value results in more effect cycles at the same given tempo. An effect programmed with a beat value of 1 will playback at the exact same rate as established by the master's effect tempo. For more information on using effect tempo and effect tap tempo please refer to Adjusting Effect Tempo of a Master with Tap Tempo.
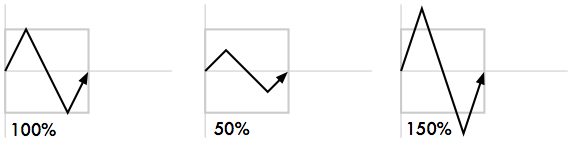
The range over which the parameter value varies. This is described in terms appropriate for the parameter, for example degrees for position parameters, or slots for slotted colour parameters.
For example, applying a Sine wave with the default size of 5Hz to a base value strobe rate of 5Hz will vary it from 0Hz through to 10Hz. You can decrease this range by adjusting the size: 2Hz will give a range between 3Hz and 7Hz.
When combining effects, adjusting specific parameters' effect sizes will change the look of the effect. For example, a circle effect comprising of a sine table on the pan and tilt can be modified to look like an elipse by altering the size of either pan or tilt.
The following diagram shows how the value of a parameter assigned to the sawtooth table changes over time, with different size values:
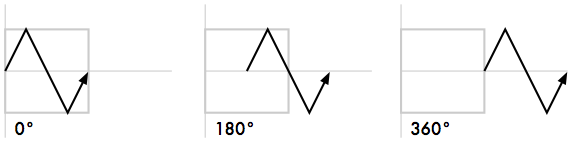
The offset sets the effect start and finish point for each effect, so they can be staggered. It is assigned in degrees.
For example, to create an intensity ripple across a range of fixtures, divide 360 degrees by the number of fixtures and offset each fixture by multiples of this amount. For example, with six fixtures offset at 0, 60, 120, 180, 240, 300 degrees. The easiest way to do this is to use fanning; see Fanning.
The following diagram shows how the value of a parameter assigned to the sawtooth table changes over time, with different offset values:
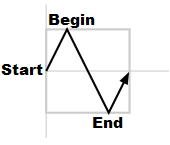
The begin and end values of an effect represent the limits that the function value will hit as it passes through the effect table. The begin and end values can be edited diretly in the effects editor window or in the programmer / cue editor. Be aware that editing the begin and end values an effect result in an adjustment to the base value for that fixture function as well.
The start value of an effect is the real world value at which the function will start the effect. The start value of an effect is directly tied to the offset value of an effect.
The following diagram shows the begin, end, and start points of a simple efffect:
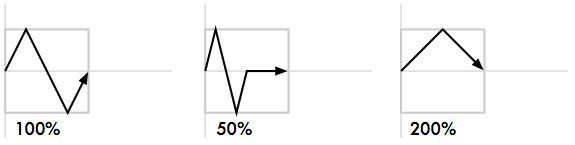
The length is the proportion of the effect's period that it is active for. It is assigned as a percentage.
The following diagram shows how the value of a parameter assigned to the sawtooth table changes over time, with different length values:
This is the number of times that the effect repeats before finishing. A dash (—) in the N Shot cell denotes that the effect will run indefinitely.
When bounce is enabled for an effect the fixture function will run one direction through the effect cycle and then reverse direction to run through the cycle in the oppositie direction and will continue to alternate the direction in which it runs through the cycle.
The direction of an effect determines whether the selected wave table will be applied to the function in a forward or reverse direction.
Allows users to synchronize the timing of effects across fixtures and/or across parameters within and throughout different playbacks. For example, using the global sync option for all effects in a show will ensure that the effects in the show will always look the same no matter how or when its cues/scenes are played back.
To apply an effect:
In the Programmer or editor, select the required fixtures and assign their base parameter values. These settings will be the ‘underlying’ state for the effect: for example, the center position of a fixture doing a circular movement effect. Equally, an intensity ripple between 0-100% will need a base value of 50% in order to use the full length of the effect.
Open + Effect : the Effects Engine and Effect Directory will open.
In the Effects Engine, select the Table cells for the fixture parameters that you want to apply the effect to.
Press Set, choose the effect table from the menu and press Enter.
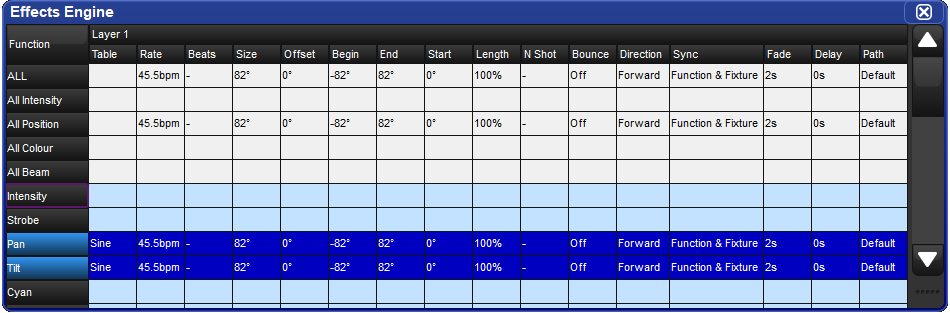
Once the effect table is assigned, you can modify the effect attributes either by editing the values in the spreadsheet or using the parameter wheels when the Effect key is selected.
| Tip |
|---|---|
You can quickly edit the attributes of all one parameter type (All Intensity, All Position, All Colour, All Beam) or for all parameters within the top five rows of the Effects Engine. |
To edit the values in the spreadsheet:
Select the cells for the parameters that you want to edit, and press Set.
Type a new value, and press Enter.
Or, using the parameter wheels:
Press the Effect key.
Select the individual parameters that you want to edit in the left hand Function column of the Effects Engine window.
Adjust the Size, Rate, Offset and Length parameter wheels as required.
Note that the parameter wheels only control the current effects row, selected using the buttons in the Function column. There are buttons for all parameter types, for all intensity, all colour, all position, all beam, and for each individual parameter type.
| Tip |
|---|---|
All effect attributes can be fanned using the Fan
key and parameter wheels; remember to select the required parameter types in the
Effects Engine Functioncolumn first. You can also
enter a value of, say, |
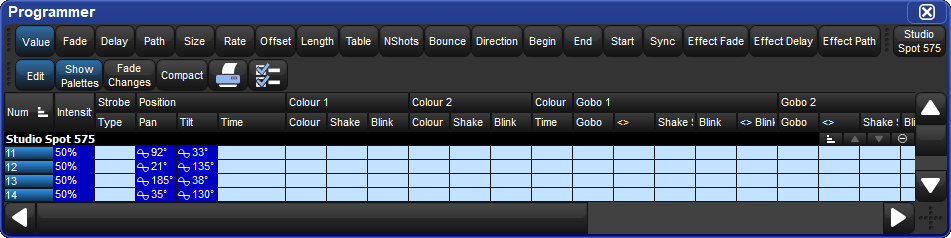
Effects can be assigned directly to specific fixtures and their attributes in any editor including the Programmer. This is helpful when you wish to make small changes without opening the Effects Engine. Effect types are assigned and edited in the Table view, whilst effect attributes can be adjusted in the Size, Rate, Offset, Length, Table and N Shot views. The views are selected by buttons at the top of the Programmer or editor window.
For example, to create an offset circle effect using fixtures in positions from the current onstage look:
Main Toolbar → Programmer : open the Programmer.
1Thru5Position Suck : sucks position information from fixtures 1 through 5 that are currently live on stage.Table : select the Table view in the Programmer; the pan and tilt column will read [Off].
Select all pan and tilt cells of the selected fixtures by clicking and dragging.
Set → Sine, Enter : choose the Sine table from the drop-down menu and confirm by pressing Enter.
Select Offset : select the Offset view in the Programmer; the pan and tilt column will read [0-Deg].
Select all pan and tilt cells of the selected fixtures by clicking and dragging.
Set
1Thru288Enter : offset pan and tilt equally across the fixtures.
Once you have applied an effect to a parameter, it will appear in the Value view of the Programmer or editor with the effects symbol next to the value:
| Tip |
|---|---|
When assigning effect parameters such as Offset, remember that values 0 and 360 Degrees are the same. Fanning a range of fixtures from 0 through to 360 degrees of offset will mean that the first and last fixtures will share the same offset value. |
Effect Spread is an offset control mechanism that appears on the 5th encoder wheel of Hog 4 and Full Boar 4 consoles and on the second encoder wheel page of all other consoles when the effect kind is selected. The effect spread is a simple way to spread the effect offset evenly among the selected fixtures. For example, an effect spread of 100% evenly distributes the effect offset values for the currently selected fixtures from 0 to 360 degrees so that every fixture within the selection has a unique offset. The effect spread value is not stored in cues, scenes or palettes. Instead the effect spread is treated as a front-end tool to establish individual offsets among selected fixtures. The effect spread value is cleared following any changes to the individual fixture's offset values and/or any changes made to the fixture selection. Effect spread is not shown in editor windows or the effect engine as it is only a manipulation control of the offset values for effects. To achieve a negative effect spread hold the minus key while turning the effect spread encoder to the left. Switching between a negative effect spread and a positive effect spread reverses the perceived direction of the effect from fixture to fixture.
Effects can also be built using two palettes and the correct command line syntax. This is helpful when you wish to make an effect that is bound by the values stored in two specific palettes. The syntax for building an effect between two palettes is Effect @ [Palette] thru [Palette]. When performing this syntax the console will construct a 5 bpm sine wave effect between the two palettes in the effect editor for the selected fixtures.
For example, to create an effect between position palette 1 and position palette 2:
Make a fixture selection (ensure the fixture selection consists of fixtures that have values stored in position palettes 1 and 2)
Effect @ Position 1thru Position 2 Enter
![[Important]](../images/important.png) | Important |
|---|---|
The palettes used to build table effects are not referenced in the effect. Therefore, once the effect is recorded into a cue, scene, or palette any references to the original palettes used to build the effect are lost. |
By default, effects values track through to subsequent cues until a new value for the particular parameter is reached. You can turn effects on and off, set them to track through in the Table column of the Effects Engine, Programmer or editor.
In the Programmer for example:
Select Table view.
Select the cell of the parameter for which you want to turn the effect off or allow to track through, and press Set.
Select Off or Track from the drop down menu.
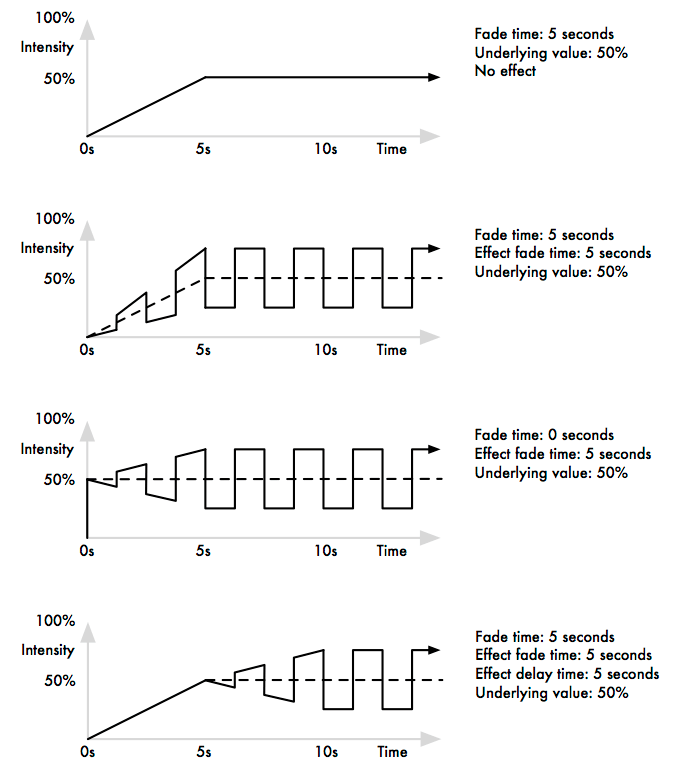
When you record a cue, scene or palette that includes effects values, each fixture parameter has its fade, delay and path value in the usual way; see Individual Parameter Timings. These timings control how the fixture parameter changes from its starting value to its underlying value in the cue or scene, as the cue or scene is played back.
You can assign separate effects timings (fade, delay and path) to control how the effects movement changes as the cue or scene is played back. Figure 14.3, “Controlling Effect Transitions with Timing” shows how different timing values control how a parameter with a step effect changes during playback of a cue.
You can assign effect fade times using the command line:
Fixture
1: select the fixtures you want to assign an effect time to, making sure that they have been given parameter values.Effect Time
4, Enter : assigns the effect fade time to 4 seconds.
To assign a effect delay time:
Fixture
1: select the desired fixture(s).Effect Time Time
2, Enter : pressing Time twice assigns the delay time.
You can also view and assign effect timing values in the Effects Engine window: