Up to 8 MIDI Timecode input devices can be mapped to a console (or Hog 4 PC). When MIDI Timecode is received by a console or Hog 4 PC it is also automatically available to all consoles connected to the show.
Follow these steps to connect and configure a MIDI timecode device on a console:
Connect the output end of a third party MIDI Timecode device to the "MIDI In" port on the back of the console. If you are using an external USB MIDI device to receive MIDI Timecode then connect the external USB MIDI device to one of the USB ports on the console. Please note that only generic "USB MIDI Class" devices are supported. Any USB MIDI devices that require proprietary drivers may work with Hog 4 PC as long as the specific driver is installed on the Windows machine but these types of USB devices that require specific drivers will not work with Hog 4 OS consoles.
Open the Network window. [Setup → Network]
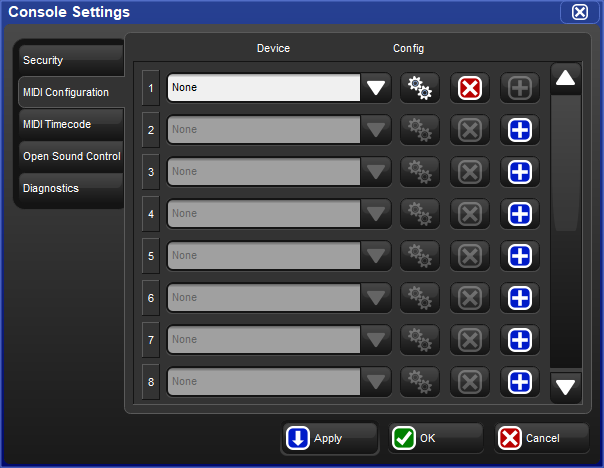
Select a console from the list of devices in the network window and then press the Settings button.
Select the MIDI Timecode tab of the Console Settings Window.
Map a MIDI device to one of the eight indexes by pressing the blue plus button located to the far right of the index, then select a MIDI device from the device drop down menu and press Apply. (On Hog 4, Hog 4-18, and Full Boar 4 consoles the built-in MIDI device will be listed as "LTCMIDI".)
To view incoming timecode for a specific MIDI device navigate to the MIDI Timecode tab of the Console Settings window and enable the "View Timecode Toolbar" button on the appropriate device mapping.
The timecode toolbar can also be displayed for a MTC device by pressing the View Timecode button at the top of the master window for any cuelist that is assigned to receive timecode from that device.
The Timecode Toolbar displays the incoming timecode type, format, value, and frame regeneration. Frame Regeneration occurs when the console does not receive a clean timecode signal and must make up for the missing frames in order to prevent missed cues. You can set how many frames of timecode are generated by the console before timecode is lost in the timecode settings window by clicking on the word movie slate icon in the timecode toolbar.

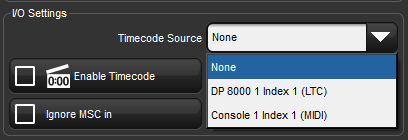
Each cuelist can be assigned to listen to different timecode sources from different consoles. To select MIDI timecode as the source:
Open → Choose : open the Cuelist window.
Options → Cuelist : go to the Cuelist pane of the Playback Options window.
Select a MIDI timecode source from the drop down list:
Ensure that the Enable Timecode button is selected.
![[Tip]](../images/tip.png) | Tip |
|---|---|
The Enable Timecode button at the top of a cuelist's master window allows for quick enabling and disabling of timecode input for that specific cuelist. |
To trigger a cue from timecode:
Open → Choose : open the Cuelist window.
Select the Wait cell for the cue, and press Set.
From the toolbar, select Timecode.
Enter a timecode value in hours, minutes, seconds and frames, in the form
hh/mm/ss.ff, then press Enter.
As well as entering timecode values manually, you can use Hog 4 OS's learn timing function to quickly associate timecode values with cues; see Learn Timing.
By default, cuelists will follow the incoming timecode, even if the timecode skips forwards or backwards; generally, this is a useful behaviour as, for example, you might ‘rewind’ the timecode during rehearsals to repeat a part of the show, and the cuelist will automatically go to the correct cue. Sometimes you may want to prevent a cuelist going backwards if the timecode goes backwards. You can do this using Trigger Forwards Only:
Open + Choose → Options → Cuelist
Select Trigger Forwards Only.
To change the timecode value used to trigger a cue:
Open → Choose : open the Cuelist window.
Select the Wait cell for the cue, and press Set.
From the toolbar, select Timecode.
Enter a timecode value in hours, minutes, seconds and frames, in the form
hh/mm/ss.ff, then press Enter.
You may need to change the timecode value for one cue, and then change the timecode values for subsequent cues by the same amount, to keep the same relative timings. For example, you might have a series of cues where each one is triggered by timecode one second after the previous one. If the timecode value triggering the first cue needs to be increased by 12 frames, you may want the values for all the subsequent cues to also be increased by 12 frames to maintain the 1 second separation. Hog 4 OS allows you to do this easily:
Open → Choose : open the Cuelist window.
Click and drag to select the Wait cells for the range of cues you want to edit.
Press Set.
Edit the timecode value of the first cell then press Enter. All the selected timecode values will be adjusted by the same amount of time added or subtracted from the first value.
You can temporarily simulate MIDI timecode on the console using the Timecode Toolbar.
To simulate MIDI timecode:
Press the simulate button on the Timecode Toolbar. Simulate is now enabled and all external timecode input for that source will be ignored.
Press the play button next to the simulate button to simulate timecode from the current clock value as displayed for that timecode toolbar.
| TIP |
|---|---|
Using the jump toolbar you can jump the simulated timecode value to six different jump points. To change the jump points click on the word "TIMECODE" on the far left hand side of the timecode toolbar. A drop down menu will appear with a set of fields allowing you to change the simulated jump points. |