Step Effects
In step effects, each step contains an on-state and an off-state. The on-state is the action the channels in the step should take when the step is active. The off -state is the action the channels in the step should take when the step is not active. Step effects are a quick and easy way to build simple chases.
When building step effects, channels must be defined for each step. This is different from absolute and relative effects.
Once complete, you may play back the effect on all channels embedded in it by pressing [Recall From] [Effect] [x] [Enter]. Or you may specify only certain channels to play back from the embedded channel list.
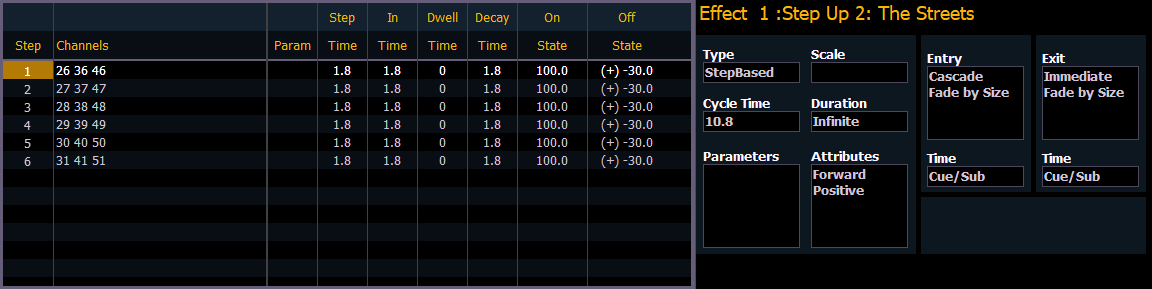
A step effect is displayed in a chart with the following columns:
- Step - indicates the step numbers.
- Channels - displays the channels in the step.
- Param - displays the parameter (if other than intensity) controlled by the step.
- Step Time - time from triggering the associated step to triggering the next step.
- In Time - the length of time for the channels to fade to the “on-state”.
- Dwell Time - the length of time the step remains in an “on-state”.
- Decay Time - the length of time it takes for the channels to fade to the “off-state”.
- On State - the parameter level (in%), or referenced data to be used for the on-state.
- Off State - the parameter level (in%) or referenced data to be used for the steps off-state. If you want the “off-state” to be the background state from playback, select the column and press [At] [Enter].
All times are entered from the keypad in minutes and seconds, tenths and hundredths.
If an effect step is on the command line or indicated in the blue text to the left of the command line, entering a number on the command line will default to selecting a step for the current selected effect.
If no step is displayed, the command line will default to an effect number.
Programming Step Effects
Use [Effect] [Effect] to open the effects list. Use <Effect> [1] [Enter] to establish the number of the effect. The CIA will repaint with unpopulated fields for the new effect.
- <Type> {StepBased} - assigns the effect as a step effect. The effect will appear in the list and the CIA will repaint with the default entries for the effect and a step chart for the effect.
- {Step} [1] [Thru] [6] - defines the number of steps. The steps will populate the chart and will remain selected.
To make identical changes to all steps at once, you may now use the page arrow keys to navigate the chart. To make changes to only a single step, specify only one step in the command line. Default values are drawn from the previous step.
Select the Channels column.
- [1] [Thru] [1] [2] [Enter] - specifies the channels for the effect. Channels 1 through 12 will be broken up and distributed through the steps in the chart. Choose the parameter you would like in the effect by pressing:
- {Parameters} <Intensity> - chooses the parameters you would like in the effect. Intensity is assumed unless another parameter is specified. All steps are now intensity based.
Select the Step Time column.
- [1] - enters a step time of 1 second.
Select the Dwell Time column.
- [1] - enters a dwell time of 1 second.
Select the Decay Time column.
- [.] [2] [5] - enters a decay time of 0.25 seconds.
Select the On State column.
- [1] [0] [0] - sets an on state of 100%.
Select the Off State column.
- [5] - sets an off state of 5%.
Adjust any of the effect details on the right side of the CIA by pressing the appropriate detail button and making changes (see Effects Editor).
Note: The cycle time is an aggregate of all of the timing in the effect and indicates how long it will take to make one full pass through the effect. If the cycle time is modified by the keypad or encoders, it proportionally adjusts all of the timing within the effect.
Range for On State and Off State
You can apply a range of levels to the on state and off state for the steps. You can either apply a range using the percentage or by using a palette. For example:
- {Steps} [1] [Thru] [6] [Enter] - selects steps 1 through 6.
Select the On State column.
- [1][0] [Thru] [1][0][0] - assigns an on state range starting at 10 and ending at 100 to steps 1 through 6. The range between 10 and 100 will be evenly divided between the available steps.
- [Intensity Palette] [1] [Thru] [5] - assigns intensity palettes 1 through 5 to the steps 1 through 6. Steps 1 through 5 will be assigned to palettes 1 through 5. Step 6 will be assigned to intensity palette 1. The range will wrap to fill any available steps.
Inserting a Step
To insert a step anywhere in the effect, specify the step you wish the new step to be inserted before.
- [Effect] [1] {Step} [4] {Insert} [Enter] - inserts a new step before step 4. If step four does not exist, it also creates the steps necessary to have “step 4” and then places a step ahead of it as well.
Inserted steps result in all succeeding steps to be bumped one place lower in the effect. In the above example, by inserting before step 4, step 4 would become step 5, step 5 would become 6 and so on. The inserted step would become the new step 4.
Deleting Steps
To delete a step from a step-based effect, specify the effect in the command line and press delete:
- [Effect] [1] {Step} [4] [Delete] [Enter] [Enter]
- [Effect] [1] {Step} [4] [Thru] [8] [Delete] [Enter] [Enter]