 in the toolbar. All currently selected channels in the selected space will be recorded into the preset at their current levels. Once created, the new preset will be listed in the Browser and the preset icon will display in the Preset Directory.
When a control station is added to a space, default presets can be created depending on your preferences. From the Program/Simulate view, you can edit the default presets or create a new look in simulation or "Live Control" and record that look as a preset.
in the toolbar. All currently selected channels in the selected space will be recorded into the preset at their current levels. Once created, the new preset will be listed in the Browser and the preset icon will display in the Preset Directory.Note: The channels or the current space selected at the time of preset creation specifies the channels that are created in the preset. Channels can be included or excluded later.
To record a preset, click the [Record] button  located in the toolbar. Alternatively, you may right-click on the already created preset icon in the Preset Directory and select either "Record Current" or "Record Simulated Levels (Selected Only)" from the context menu.

Record will store the current channels in the active space or selected channels only at their current levels into the preset.
There are multiple ways to playback a recorded preset:
A preset displays its state graphically through the icon colors:
A recorded preset can be edited to alter characteristics of the preset such as intensity, fade times, delays, and which channels are affected. This is a "blind" edit since changes made in edit mode are not applied to the actual output.
Use the Property Editor to change shared preset properties, such as fade and delay times.
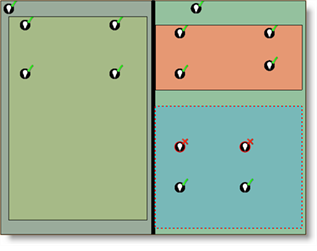
Channel indicators are displayed to show when a channel is included or excluded from a preset. There must be a preset selected to see any channel indications. An excluded channel is displayed in the Plan workspace with a red X and an included channel is displayed with a green check mark.
 in the toolbar.
 in the toolbar.
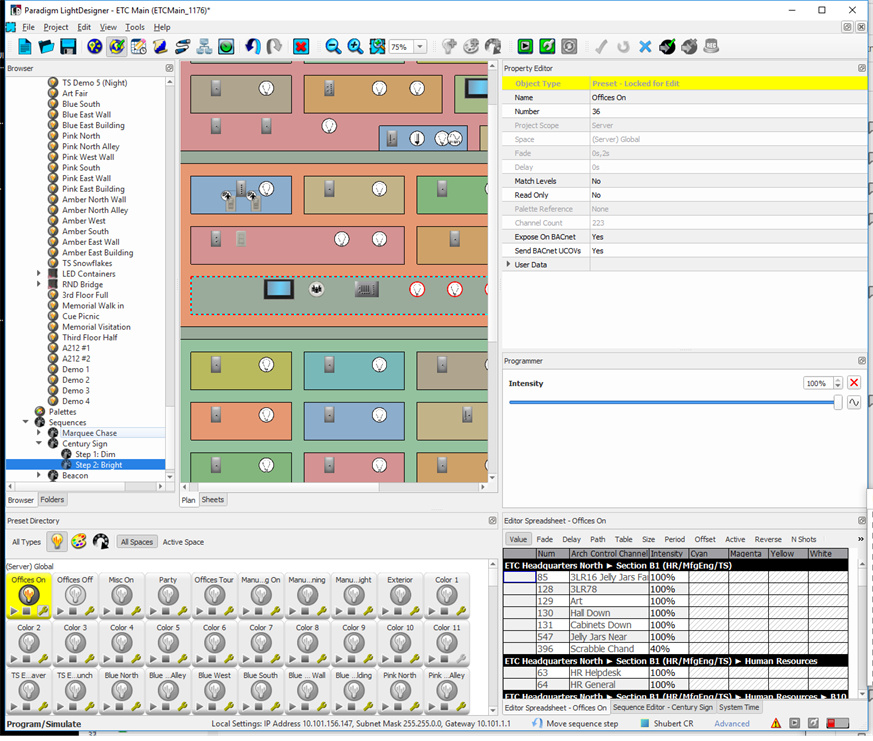
To edit a preset, click on the [Edit] button ![]() on the preset icon located in the Preset Directory. This places the selected preset into "Edit Mode", simulates the preset in the Plan workspace, and updates the parameter values in the Editor Spreadsheet. The preset icon changes to a yellow highlight and the Property Editor display in yellow highlight "Preset - Locked for Edit".
on the preset icon located in the Preset Directory. This places the selected preset into "Edit Mode", simulates the preset in the Plan workspace, and updates the parameter values in the Editor Spreadsheet. The preset icon changes to a yellow highlight and the Property Editor display in yellow highlight "Preset - Locked for Edit".
Note: The Property Editor states that the preset is "Locked for Edit". This indicates that the property edits on other objects, outside of the selected preset are not allowed until you have exited preset edit mode.
Tip: To create a reference to a palette within a preset, you must first apply the palette while in "Edit Mode" for the preset.
Note: The Editor Spreadsheet displays the name of the selected palette instead of the channel attributes or values that are referenced by the palette.
The Knockout button provides two functions depending on whether a preset, palette, or sequence is in edit mode or not. When not in Edit Mode, the knockout button simply applies default values for a given parameter, for example 0% intensity, or 0/0 degrees for pan and tilt. When in Edit Mode, the knockout button removes individual attributes of channels from the preset, palette, or sequence step you are editing.
For example: To remove pan and tilt from a preset for moving lights, within the Programmer window, click the [Knockout] button ![]() next to the attribute you want exclude from the preset.
next to the attribute you want exclude from the preset.

To reinstate the attribute value, use the Programmer to set a value or use the Editor Spreadsheet to specify the new value.