Fresnel Setup
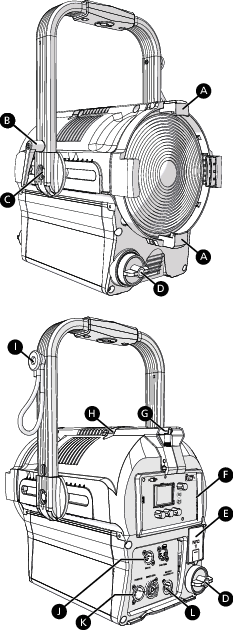
| A | Accessory holder: Insert accessories into the two available slots from either side of the holder, and then lock the holder. |
| B | Yoke tilt-lock: Tilt the fixture as needed, and then turn the tilt-lock clockwise to lock the position. If necessary, pull the tilt-lock away from the stem to adjust the tilt-lock position. |
| C | Adjustable yoke: Loosen the bolts, and then shift the adjustable yoke forward or backward as needed to balance the fixture. Tighten the bolts to secure. See Add Accessories. |
| D | Zoom knob: Rotate the zoom knob on either side of the fixture to adjust from spot to flood. |
| E |
|
| F | User interface: View the fixture status, set the DMX address and mode, or set stand-alone options. |
| G |
|
| H | Safety cable attachment point: See Mount the Fixture. |
| I | Cable tie: Store power cable on the yoke. |
| J | DMX In and DMX Thru connectors: Five-pin XLR connectors for DMX/RDM in and thru. |
| K | Power In and Power Thru connectors: powerCON® TRUE1 TOP connectors for power in and thru. |
| L | Battery connector: |