
In addition to manually pressing Go to execute you can also automate the triggering of a cue by assigning a wait value for the cue. The wait value for a cue is assigned in the wait column of the cuelist window. To assign how long a cue timing:
The Trigger Toolbar
A cue's wait column options are:
A wait is displayed as the time value in the Wait cell.
The follow is displayed in the Cuelist window as ‘Follow + [time]’.
The follow time should not be confused with the wait time. The follow time controls the time between the end of one cue and the triggering of the next, while the wait time controls the time between the triggering of one cue and the triggering of the next.
Manual cues are useful because the word ‘Manual’ appears in the Cuelist window to remind the operator that they need to press the Go key. They are also useful to prevent times being recorded into the Wait column when using Learn Timing.
Learn Timing allows you to assign a cue's wait time value by manual executing the cues with the Go key when the learn timing option is selected for the cuelist. If a timecode clock assigned to that list is running when learn timing is enabled then the wait value recorded into the wait cell will be a timecode value.
To use Learn Timing with timecode:
Now when you run the timecode, the cues will be triggered when the timecode reaches each cue's assigned frame. For more information on timecode, see MIDI Timecode.
To use Learn Timing without timecode:
Now when you run the first cue, the subsequent cues will be triggered at the same intervals as when you ran them manually.
Tip: Learn Timing will only set a trigger on a cue that is currently set to Halt - that is, it has an empty Wait cell. To remove existing wait times from cues, select the wait cell(s) and press Set. Select Halt from the toolbar.
To assign a cue to be triggered at a particular time and date using Hog 4 OS's internal clock:
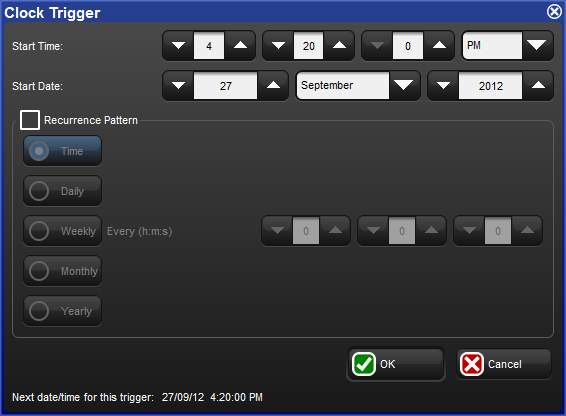
Tip: The next valid trigger date and time is shown at the bottom of the Clock Trigger window.
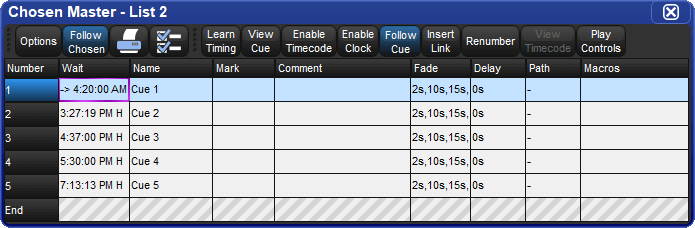
Once you have set a clock trigger, the cuelist window will now indicate the trigger time and type in the cue’s Wait column:
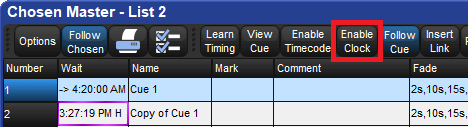
To enable or disable the clock functions on a cuelist, toggle the Enable Clock button in the cuelist window:
Tip: You can also enable or disable the clock functions for a cuelist in the Cuelist Cuelist Options window, or using macros; see Macros.
Clock triggers can be programmed to trigger on a regularly scheduled interval such as every hour, day, or week based on the provided start time of the trigger and selected recurrence pattern. To set a recurrence pattern for a clock trigger check the Recurrence Pattern check box. Then select the frequency (Time, Daily, Weekly, Monthly, Yearly) for which the trigger should recur. A set of more complex options are then provided to further customize the recurrence pattern.
For daily triggers, a recurrence value of "every 0 days" nullifies the recurrence pattern and thus the clock trigger will only fire once on the start time specified.
For weekly triggers, a recurrence value of "every 0 weeks" indicates that the clock trigger will fire on the days specified but only for the upcoming week. For example, a weekly pattern value of "every 0 weeks" with the Monday and Tuesday options checked will fire the clock trigger on the upcoming Monday and Tuesday and then stop recurring.
The Clock Toolbar shows the time and date according to the Hog 4 OS clock, and information about the next cue due to be triggered. To open the Clock Toolbar:

The Clock Toolbar will automatically update its fields according to the next valid trigger.
Tip: You can assign the format of the date and time in the Appearance pane of the Preferences window. The Clock Toolbar, Cuelist triggers and the Command Line Toolbar clock will display in the selected format.