Eos Family Service Notes
Below are links and instructions for Eos Family Service Notes, which are included with Service Kits to walk through performing various hardware upgrades and repairs in the field.
To cut down on paper waste, ETC offers service documentation on our support site at support.etcconnect.com. To access the instructions for these kits, use your phone to scan the QR code, or visit the link underneath.
CR2032 Battery Holder Replacement
4250M3305

support.etcconnect.com/ETC/
FAQ/CR2032_Battery_Holder_for_replacing_BT161
M8197-F SSD Firmware Update
4350M3315

Windows 10 SSD Replacement
4350M3316

support.etcconnect.com/ETC/
Consoles/General/Win10_SSD_Replacement
Ti and Gio Wrist Rest
4350M3307

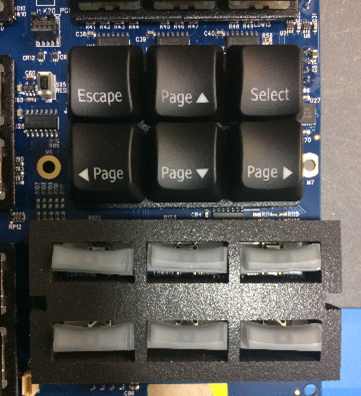
Ti and Gio Face Panel Keyboard Retrofit
4350M3304
This document outlines the process of updating the face panel keyboard used in Eos Ti and Gio consoles to newer hardware with Cherry MX keys. This kit is backwards-compatible with all Eos Ti and Gio console hardware.
CAUTION: This keyboard requires Eos Family software v3.1.4 or later.
If you have any questions or issues with this process, please contact ETC Technical Services.
WARNING: This kit is intended for professional use only. ETC is not responsible for any damage resulting from improper installation. Read these instructions completely before beginning work. Contact an Authorized Service Center for assistance.
- Power down the console and unplug it from mains power.
- Lower the display panel completely.
- Unlock the two locks on the bottom of the chassis using a flathead screwdriver or coin and open the face panel.
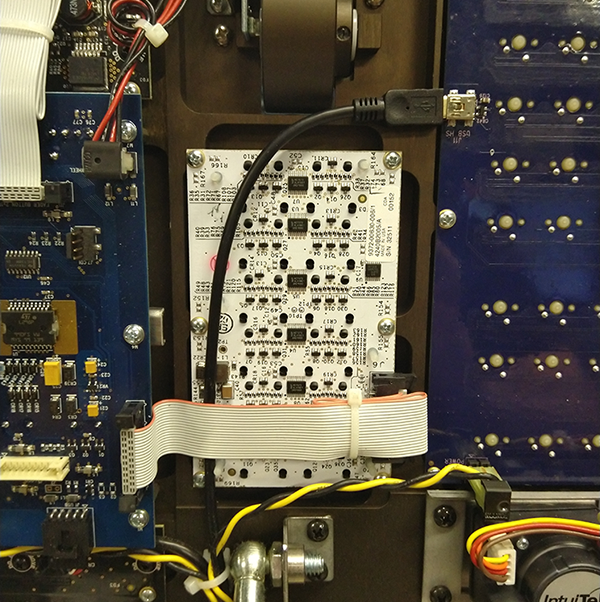
- Carefully disconnect the cable connections from the face panel keyboard. Take a picture or a note of these connections to reference when reconnecting them to the new keyboard.
- Remove the 17 screws indicated in the image below and set them aside, as you will need them to install the new keyboard. Do not remove screws labeled “DO NOT REMOVE."

- Remove the old face panel keyboard.
- Install the new face panel keyboard using the screws removed in step 5. Ensure the keys and included foam light blocker are aligned appropriately. You may need to trim the foam for an optimal fit.
Note: You may wish to test keyboard functionality before reinstalling all the screws. If so, proceed through the remainder of the steps and verify the new keyboard is working, then reopen the console and install any remaining screws.
- Trace the existing USB keyboard cable back to the console motherboard. Take note of the cable path and motherboard connection. You will install the replacement cable using the same cable path and motherboard connection.
- Remove the back panel covering the motherboard, use wire cutters to carefully cut the cable ties, and remove the existing cable. The old keyboard circuit board and cable are no longer needed. Dispose of or recycle unused components according to the programs provided by your local jurisdiction.
- Attach the replacement cable to the motherboard and reinstall the back panel. If your kit contains two cables, use the cable with connectors that match the cable you removed. Cables with a 5-pin connection header should be installed with the red wire on pin 1, towards the front of the console. Other cables use a standard USB A connector.
- Reroute the cable to the face panel keyboard, insert the Mini B connector, and secure the cable using the included cable ties.
- Lower the console face panel and lock it closed.
- Plug the console back into mains power and power it on.
- Navigate to ECU > Settings > Maintenance and launch the Face Panel Test application.
- Test all keys, buttons, level wheels, and encoders to check the functionality of the new keyboard.
If all hardware is working as expected, your new face panel keyboard is correctly installed.